How to Setup Interlocking in Ingressus
Introduction
For higher-level security, interlocking is the fundamental parts of door access security where two doors are interconnecting, where each of the doors must entirely close before one could access another door. This feature is to prevent someone from tailgating authorized personnel and entering the room without permission.
Interlocking is available in Ingressus II and Ingressus IV controller because it involved the installation of at least two doors.
Requirements
- Ingress software - Ingressus II or Ingressus IV controller - Slave reader connected to Ingressus controller - Door sensor installed at the door Ingress software must be connected to Ingressus controller while each door must be installed with the door sensor to monitor the door open-close activities. How to activate interlocking? Steps
Select ‘DEVICE’ -> click ‘Zones’ -> select ‘Interlocking’ -> click ‘ADD ZONE’ -> rename interlocking zone
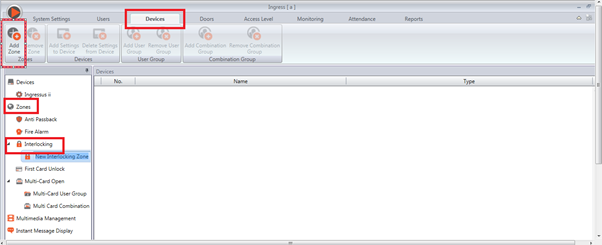
Select interlocking zone “Server room” -> click ‘ADD SETTING TO DEVICE’ -> select check box for the selected device -> click ‘OK’

Select device “Ingressus ii“ -> Click ‘EDIT’ -> Select ‘INTERLOCKING BETWEEN DOOR 1 AND DOOR 2’ -> ‘SAVE’

Synchronize software with controller -> Click on Icon Ingress -> Select ‘NOTIFICATION’

Click check box -> ‘START SYNCHRONIZE’ -> click start synchronize again

How Does It Work?
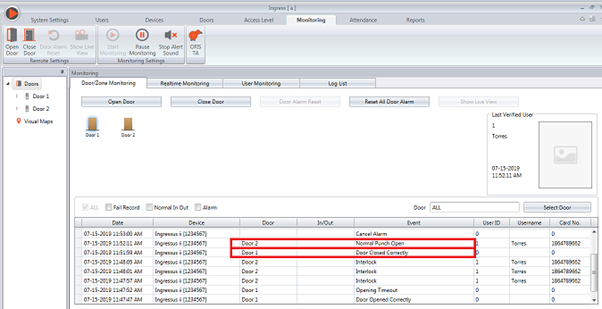
Access the first door. If you try to open the second door without closing the first door, you can see the ‘Interlock’ sign appears.

You can only access the second door when you close the first door properly.
Note: If some of the screenshots or steps viewed here are different from the ones in the current system, this is due to our continuous effort to improve our system from time to time. Please notify us at info@timeteccloud.com, we will update it as soon as possible.
Related Articles
Ingressus Metal Casing Setup
Introduction Ingressus controllers are designed to control access for a one-door (Ingressus I), two-door (Ingressus II) and four-door environment (Ingressus IV). With Ingressus, a user needs to verify his identity at a Wiegand terminal or an RS485 ...How To Setup Ingressus 2 Control Double Leaf Door
Introduction Some companies use double-leaf doors in their premises or offices as the main entrance. Most of them require a simple system that allows both doors to open simultaneously, making it easier for people to enter and exit the office. In this ...Ingressus IV and Slave Devices
Introduction Ingressus IV is FingerTec’s latest advance access controller which supports access control up to 4-doors. In short, Ingressus IV can be described as a 4-In door controller. A total of 4 Wiegand input ports is available in Ingressus IV. ...Activating the Door Closure Delay Siren in Ingressus
Introduction Security is an important aspect in every organization nowadays. Improper security measures may cause bigger problems such as robbery, data theft or even endanger the safety of a person. Even with the proper access control products ...Ingressus 4 In/Out Device : K-Kadex / I-kadex pair with R2c / R3c
Introduction Ingressus IV is a controller that supports access control for 4 doors. By default, the Ingressus IV only supports 1 Wiegand device for each door as In-device. However, by using RS485 slave, we can make the setup to have an Out-device. ...