Wiring Guide To Setup TimeTec BLE-2 With FingerTec Controller
Introduction
Introducing TimeTec latest product: TimeTec BLE-2 Smart Door Controller which is a new technology for access door controller that brings convenience in unlocking doors as well as enhancing security.
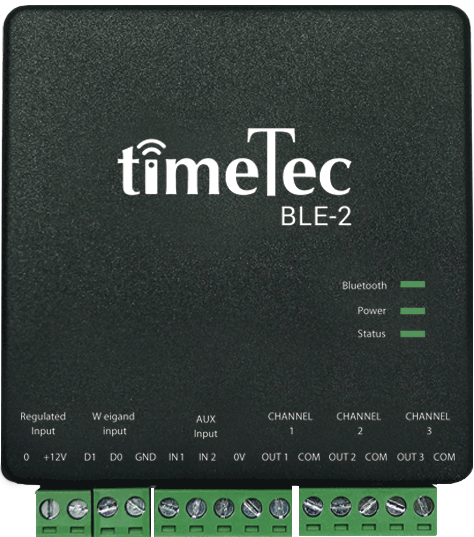
TimeTec BLE-2 uses Bluetooth Low Energy (BLE) technology that allows users to access doors through smartphone via TimeTec Security App. In this Application, the system provides you with up to four choices of unlocking your doors which are Tap, Voice, QR Code, and Auto-Unlock.
In this guide, we will show you the wiring required to setup TimeTec BLE-2 with the current existing FingerTec devices. This is particularly handy for customers that are still using FingerTec products and would like to try out our latest Door Controller along with the Smartphone App function.
Wiring Installation: -
1) NO – COMM
Normally, this wiring connection is used on FingerTec devices, i.e. Adaptec AC door controller. This connection operates like a push button connection. Therefore, when users proceed to carry out verification on the device, the NO - COMM point will be triggered and send the dry contact signal to the IN 1 and 0V Aux Input at TimeTec BLE-2.
Note that this wiring connection can also be used with FingerTec latest readers with door access function. As such, you will need to follow the wiring diagram as shown in the picture below.
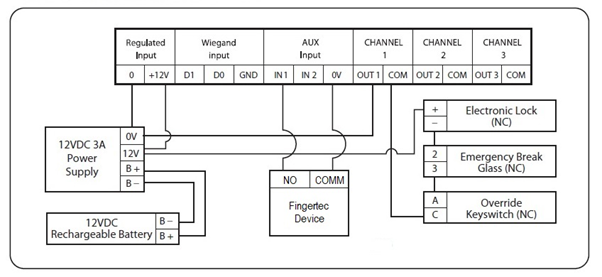

Once completed the setup, users can not only unlock doors via Fingerprint verification but also with their smartphones using TimeTec Security (Tap, Voice, QR Code, Auto-Unlock). Additionally, this wiring can also be used in installing Adaptec Plus and Adaptec X Controller; for users who decided to replace Adaptec with the new generation of door controller.
Note: If some of the screenshots or steps viewed here are different from the ones in the current system, this is due to our continuous effort to improve our system from time to time. Please notify us at info@timeteccloud.com, we will update it as soon as possible.
Introducing TimeTec latest product: TimeTec BLE-2 Smart Door Controller which is a new technology for access door controller that brings convenience in unlocking doors as well as enhancing security.
TimeTec BLE-2 uses Bluetooth Low Energy (BLE) technology that allows users to access doors through smartphone via TimeTec Security App. In this Application, the system provides you with up to four choices of unlocking your doors which are Tap, Voice, QR Code, and Auto-Unlock.
In this guide, we will show you the wiring required to setup TimeTec BLE-2 with the current existing FingerTec devices. This is particularly handy for customers that are still using FingerTec products and would like to try out our latest Door Controller along with the Smartphone App function.
Wiring Installation: -
1) NO – COMM
Normally, this wiring connection is used on FingerTec devices, i.e. Adaptec AC door controller. This connection operates like a push button connection. Therefore, when users proceed to carry out verification on the device, the NO - COMM point will be triggered and send the dry contact signal to the IN 1 and 0V Aux Input at TimeTec BLE-2.
Note that this wiring connection can also be used with FingerTec latest readers with door access function. As such, you will need to follow the wiring diagram as shown in the picture below.
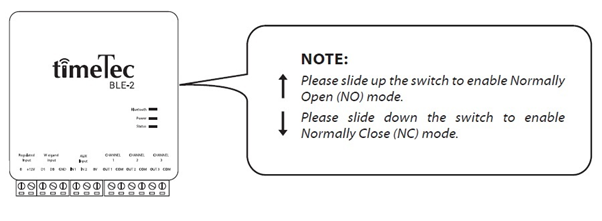
Type 1: NC Type Electronic Door Lock
Type 2: NO Type Electronic Door Lock
Switch For BLE-2 Wiring Door Lock Type.
Once completed the setup, users can not only unlock doors via Fingerprint verification but also with their smartphones using TimeTec Security (Tap, Voice, QR Code, Auto-Unlock). Additionally, this wiring can also be used in installing Adaptec Plus and Adaptec X Controller; for users who decided to replace Adaptec with the new generation of door controller.
Note: If some of the screenshots or steps viewed here are different from the ones in the current system, this is due to our continuous effort to improve our system from time to time. Please notify us at info@timeteccloud.com, we will update it as soon as possible.
Related Articles
How To Setup TimeTec BLE-2 Without Modifying The EM-Lock Wirings
Introduction In this link, we’ve described how to add TimeTec BLE-2 onto existing FingerTec Device. However, we received some feedbacks on whether is it possible to retain the arrangements of the EM-Lock wiring connection as well. This is to prevent ...TimeTec AWDMS Hardware Requirement and Installation Guide
INTRODUCTION The FingerTec latest facial recognition models such as Face ID 5 series and Face ID 6 use new firmware and architecture that requires a new SDK set to ensure seamless integration of hardware and software. Therefore, TimeTec introduces ...Fingertec TCMSv2 Installation Guide
Introduction TCMSv2 is a Windows-based software to manage the attendance data and generating the report to ease the human resource's work. Process 1) Download the TCMSv2 installer from this link: ...How To Install FingerTec Q2i On Turnstile
Introduction: Turnstile is a form of gate which provides access to an individual at a time. It also can be utilized as a way to enforce a one-way traffic for the community in addition to restricting passage to only authorized individuals. In this ...Fingertec TCMSv3 Installation Guide
Introduction TCMSv3 is built for the single user in order to manage the time attendance data in the organization. TCMSv3 is developed to replace the TCMSv2 software with the updated and fresh user interface to ease the user's experience in generating ...