WiFi Configuration Guide For FingerTec TA100C
Introduction:
WiFi is considered as one of the most required technological aspects for a modern lifestyle. As such, there are many WiFi compatible devices offered in the market today that can connect to the Internet. The WiFi option also allows for an easier biometric device installation without the need for wiring as well as facilitates a faster and stable real-time transfer of attendance data. That said, FingerTec likewise provides a variety of biometric devices which can support WiFi connection, i.e. TA100C, TA200 Plus, Q2i, TA700W and all Face ID Models.
Hence in this technical tip, we will be providing a step by step guide on how to connect FingerTec TA100C device to a WiFi Hotspot.
Process:
1. In FingerTec TA100C device, proceed to Menu > Comm > Wireless Network. *Note that Wireless Network in the Comm section will only be displayed after the WiFi Settings has been enabled for the device.
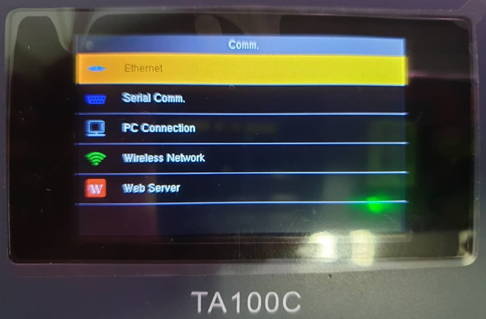
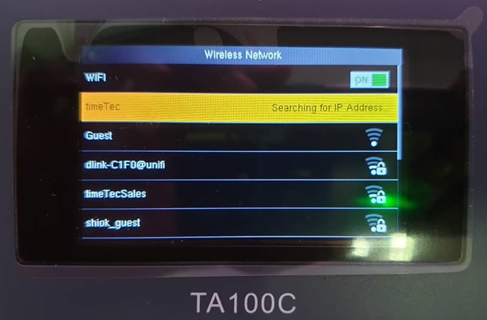
2. Once done, the list of available WiFi Hotspot in range will be displayed in the Wireless Network section.

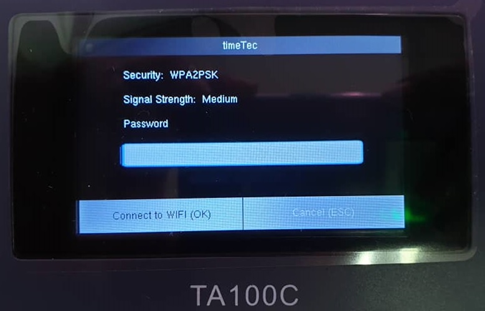
3. Choose the Network that you want to connect to and proceed to Insert the Network Password. Once done, select Connect to WiFi. Please note to use the Right Key button to switch between Alphabetic Characters and Alphanumeric Characters.
4. Moving on, the device will then proceed to connect into the network. If the error “Searching for IP Address” still persists after two minutes; please check your WiFi password again or your Wi-fi router setting.
5. The connection Status will display the text ‘Connected’ after the device has successfully connect to the WiFi router.
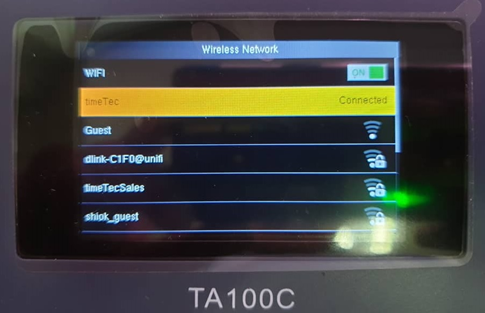
6. You can also press the M/Ok button to view the WiFi Connection details as shown in the screenshot below. Here, the WiFi Signal Strength and Device IP address will be displayed as well.

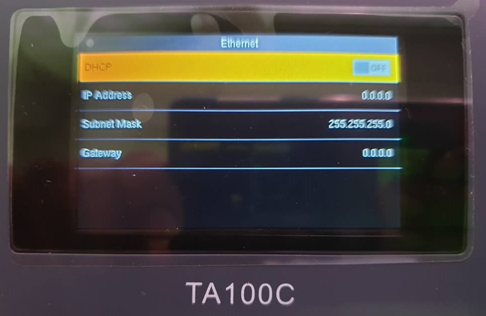
7. If you have an IP address that you wish to insert Manually at the device, you can do so by turning “Off” the DHCP feature at Menu > Comm > Wireless Network > Advanced. Next, proceed to key in your Network IP address. Note that by default the DHCP setting is turned On for all FingerTec devices.
Note: If some of the screenshots or steps viewed here are different from the ones in the current system, this is due to our continuous effort to improve our system from time to time. Please notify us at info@timeteccloud.com, we will update it as soon as possible.
WiFi is considered as one of the most required technological aspects for a modern lifestyle. As such, there are many WiFi compatible devices offered in the market today that can connect to the Internet. The WiFi option also allows for an easier biometric device installation without the need for wiring as well as facilitates a faster and stable real-time transfer of attendance data. That said, FingerTec likewise provides a variety of biometric devices which can support WiFi connection, i.e. TA100C, TA200 Plus, Q2i, TA700W and all Face ID Models.
Hence in this technical tip, we will be providing a step by step guide on how to connect FingerTec TA100C device to a WiFi Hotspot.
Process:
1. In FingerTec TA100C device, proceed to Menu > Comm > Wireless Network. *Note that Wireless Network in the Comm section will only be displayed after the WiFi Settings has been enabled for the device.
2. Once done, the list of available WiFi Hotspot in range will be displayed in the Wireless Network section.
3. Choose the Network that you want to connect to and proceed to Insert the Network Password. Once done, select Connect to WiFi. Please note to use the Right Key button to switch between Alphabetic Characters and Alphanumeric Characters.
4. Moving on, the device will then proceed to connect into the network. If the error “Searching for IP Address” still persists after two minutes; please check your WiFi password again or your Wi-fi router setting.
5. The connection Status will display the text ‘Connected’ after the device has successfully connect to the WiFi router.
6. You can also press the M/Ok button to view the WiFi Connection details as shown in the screenshot below. Here, the WiFi Signal Strength and Device IP address will be displayed as well.
7. If you have an IP address that you wish to insert Manually at the device, you can do so by turning “Off” the DHCP feature at Menu > Comm > Wireless Network > Advanced. Next, proceed to key in your Network IP address. Note that by default the DHCP setting is turned On for all FingerTec devices.
Note: If some of the screenshots or steps viewed here are different from the ones in the current system, this is due to our continuous effort to improve our system from time to time. Please notify us at info@timeteccloud.com, we will update it as soon as possible.
Related Articles
TA 200 Plus Wifi Setup
Introduction FingerTec offers an array of time attendance devices to fulfill the market's requirements. However, on top of the various selection, there are select devices customizable to the client's specific requirements such as adding a Wi-Fi. To ...TA200 Plus WiFi DHCP
The WiFi is a mechanism that allows electronic devices to exchange data wirelessly over a computer network. The TA200 Plus has an optional connection function using the Wifi to connect to a network resource via a wireless network access point. The ...Ingress VMS Installation Guide
Introduction Ingress VMS is a Web Based Visitor Management System, which is fully integrated with FingerTec Ingress Door Access System for a more secure visitor management system. Currently, Ingress VMS only supports FingerTec Ingress with MySQL ...TA200Plus : Introducing WiFi Feature
Introduction You can now customize TA200Plus with WiFi components and install our firmware for WiFi support. WiFi Component 1) WiFi Module 2) WiFi Antenna 3) WiFi Module Holder 4) Instruction of WiFi Module Please provide your terminal information ...FAQs - FingerTec BioBridge SDK
Introduction FingerTec terminals come bundled with either the TCMSV2 or Ingress software for a Time Attendance system. Both software packages come as a complete system for all your time attendance and door access needs. However, for system developers ...