Manage Replacement Leaves (Time Off in Lieu) with TimeTec Leave
Introduction
To achieve the best working conditions, companies can now allow staff to apply for replacement leave credits in TimeTec Leave whenever they have to work on public holidays and weekends. This is sometimes known as “Paid Time Off in Lieu” and this means that instead of overtime pay, their staff can be compensated with additional rest days to make up for the busy peaks. This flexible option also helps to balance the budgetary concerns that may arise from an irregular schedule in business operations.
Process
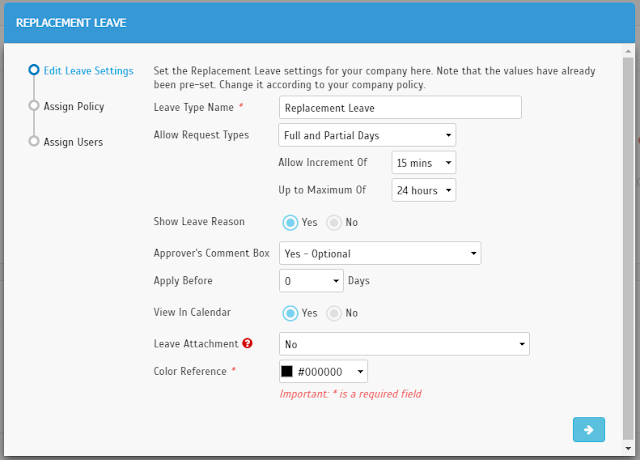
i. Enable this option in System Settings - Replacement Leave allows users to apply for replacement credit whenever they work after standard hours (in accordance with individual employment contract). By default, this option is turned off and can be enabled or disabled at any time.ii. After enabling this option, Replacement Leave Wizard will pop-up and users will need to follow the instructions in the Wizard to configure the required Leave Settings > Assign to the relevant Leave Policy and Users (or you can skip for now and do this at Leave Settings > Leave Policy later).
iii. Replacement Credit module will now be displayed in the Menu (for assigned users who are entitled to this leave and their approvers).
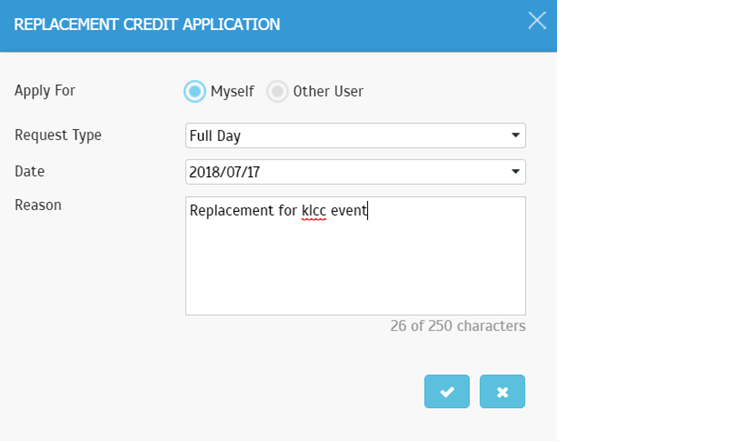
iv. User: To apply for Replacement Credit > Go to Replacement Credit > Application tab > Click ‘Apply’ button > Fill in the form > Submit.
v. Approver: To approve Replacement Credit > Go to Replacement Credit > Approval tab > Edit > Click button to ‘Approve Request’/ ‘Reject Request’.
vi. Once approved, the Replacement Credit will be added to the user’s Replacement Leave balance. Users can then apply for Replacement Leave in the system through the usual leave application procedures.
Please note that Users and Approvers can also perform step (iv) to step (vi) above through the mobile application.
For more details of what’s available with this feature, please refer to the step-by-step guide below. There are 4 sections to this topic:
A) How to Enable/ Initial Setup (Web)
B) How to Apply & Approve Replacement Credit (Web)
A) How to Enable/ Initial Setup (Web)
1. Login to Admin account and go to System Settings. Click Edit, turn on the toggle button to enable Replacement Leave option (Disabled by default).

2. After enabling the option, Replacement Leave Wizard will pop up. Follow the instructions in the Wizard to configure the required Leave Settings > Assign to the relevant Leave Policy and Users (or you can skip for now and do this at Leave Settings > Leave Policy later).
ii) Step 2: Assign Policy – Assign Replacement Leave to Leave Policy (can be skipped)
Note: If you skip, you can configure this later at Leave Settings > Leave Policy.
iii) Step 3: Assign Users – Assign Replacement Leave to Users (can be skipped)
Note:
If you skip, you can configure this later by applying a Leave Policy that contains Replacement Leave to selected user or directly go to Manage User > Leave Settings > Allowance > Add Leave Type.
iv) Success Message after completing Replacement Leave Wizard

3. You have now enabled the Replacement Leave module in your company’s account. This function can be disabled by turning off the same toggle button in System Settings (refer to step 1).
i) Settings after disabling Replacement Leave
B) How to Apply & Approve Replacement Credit (Web)
1. Once the Admin enables this feature, relevant users will be able to view a Replacement Credit Module in the Menu.
Note: It will only be displayed for assigned users who are entitled to this leave and their approvers. Therefore, Admin will only be able to view this if they have also been assigned as an Approver for a user entitled to Replacement Leave. Likewise, non-Admin can see this if they are Approver for relevant users.
i) Admin/ Approver View
ii) User View
2. Replacement Credit Application
Application
To apply, go to Replacement Credit > Application tab > Click ‘Apply’ button on the upper-right corner > Fill in the form > Submit.
On the Application page, besides applying for credit, users can view replacement balance and application status.

3. Replacement Credit Approval
Approval
To approve, go to Replacement Credit > Approval tab > Edit > View Request form > Click button to ‘Approve Request’/ ‘Reject Request’.
Note: If some of the screenshots or steps viewed here are different from the ones in the current system, this is due to our continuous effort to improve our system from time to time. Please notify us at info@timeteccloud.com, we will update it as soon as possible.
Related Articles
How to Submit A Replacement Credit and Approval via TimeTec HR Application & TimeTec Leave Web
Introduction Replacement Leave is commonly used among companies where the staff work on a Holiday/Rest day and in return, are entitled to an additional day of leave. TimeTec allows users to request their entitlement of replacement leave using the ...Handle Employees’ Leave With Crunch Time In TimeTec Leave
Introduction: TimeTec Leave is a cloud-based solution that allows staffs to better manage their leave and contribute more productively to the company’s development. However on certain occasions, it is necessary for the company to schedule an annual ...How To Add New User to TimeTec TA (Geofence User)
Introduction Time attendance, scheduling management & work from home are effective solutions for the modern workforce. The TimeTec TA automates your time data collection process and seamlessly integrates it with biometrics identification devices. ...How to Import Leave in TimeTec TA
Introduction Every organization has its own set of leaves that employees are entitled to. Leave types such as Annual Leave, Sick Leave, Maternity Leave, Paternity Leave, Bereavement, etc. This section will show you how to import and update user leave ...Using TimeTec HR (Leave) App for The First Time
Introduction TimeTec HR is a new app by TimeTec that consolidates several TimeTec solutions: Attendance, Leave, Claim, Access and Payroll, into one super app. This article will guide you on how to use the leave module in TimeTec HR. Benefit By ...

