How to Install OFIS Scanner in Windows 8.1
Introduction
Microsoft has released an upgrade for Windows 8, which is Windows 8.1 (codenamed Blue), which aims to address the complaints concerning Windows 8 from users and reviewers. The enhancement includes an improved start screen and visible Start Button, to name a few. However, in all the enhancements, Microsoft has retained the requirement of digitally signed drivers.Driver Signing ensures that the software publishers and hardware vendors are trusted and verified by Microsoft in order to protect your system from being infected by malware. Due to this reason, Windows 8.1 will not install the OFIS Scanner driver as it is not digitally signed. Fret not as you can overcome this issue by following the steps below.
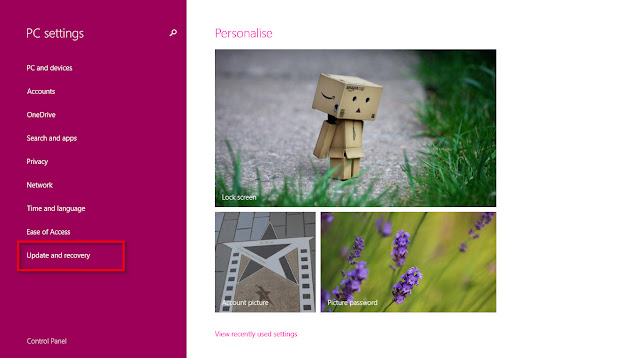
1. From the Start Screen, click Settings.
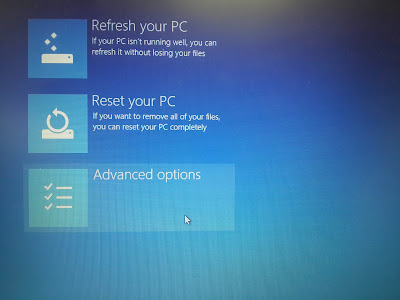
4. Click Recovery look for Advance startup. Click Restart Now.
5. After the restart, you are required to choose an option. Click Troubleshoot.

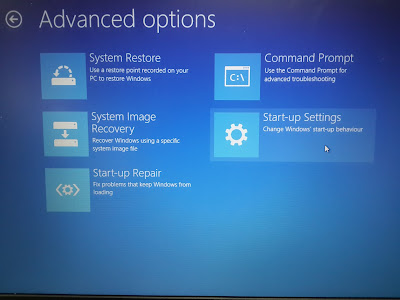
6. Click Advanced options and click Start-up Settings.
7. At the Start-up Settings, click Restart.
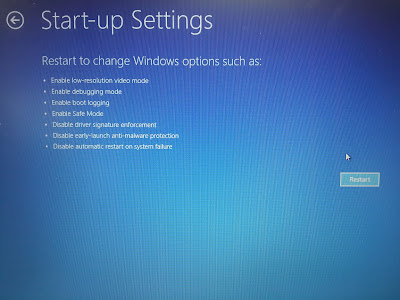
8. In the next menu, press F7 to disable driver signature enforcement.

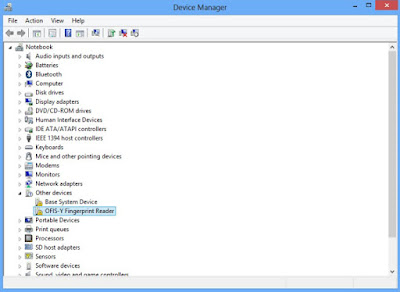
9. Go to Device Manager and update the OFIS-Y Fingerprint Reader’s driver.
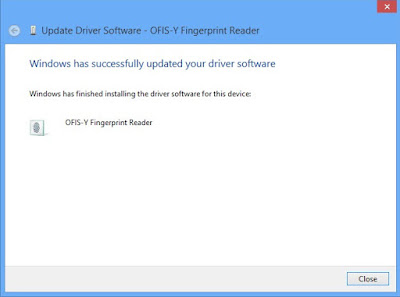
10. This time around, Windows 8.1 will prompt a security window to reconfirm the installation. Click ‘Install this driver software anyway’.

11. Once the installation has completed, you can now use the OFIS-Y with Windows 8.1.
Note: If some of the screenshots or steps viewed here are different from the ones in the current system, this is due to our continuous effort to improve our system from time to time. Please notify us at info@timeteccloud.com, we will update it as soon as possible.
Related Articles
How to Install OFIS Scanner in Windows 8
Microsoft’s latest operating system Windows 8 not only encourages us to use Digitally Signed Drivers, but it also checks to see if the driver has been modified. If the driver has been modified, the operating system will abort the installation. Take ...Learn to Activate OFIS TA Scanner in Ingress and TCMS V3 for Fingerprint Registration via PC
INTRODUCTION Integration of OFIS TA with FingerTec's latest software solutions, Ingress and TCMS V3, provides a highly secured, yet simple and affordable solution for fingerprint enrollment as well as for user verification. With OFIS scanners, users ...OFIS Scanner for Fingerprint Template Registration and Time Attendance Device for Clocking Verification (OFIS TA) in TCMS v3/Ingress
Introduction With OFIS scanner, users can perform fingerprint template registration in TCMS v3 / Ingress or use the OFIS scanner as a Time Attendance Device for verification (OFIS TA). The following will explain the steps and procedure to either use ...Using the OFIS-Y Scanner with TCMS V2
The OFIS-Y Scanner works with the TCMS v2 by using a file name Biokey.ocx. The version of Biokey.ocx is different for both OFIS-X and OFIS-Y scanners. In the current TCMS V2, you will find that the OFIS-Y scanner does not work with the software, as ...How to Install and Run the TCMS v2 Software with Windows 7 Platform
To install the TCMSv2 software, double click on the installation file (or run direct from the Go Green DVD). By default, the installer will install the TCMSv2 software into the C: drive and it will also create a shortcut icon on the desktop. 1. You ...