TimeTec TA: How To Manage Geofence Feature For Out of Area Clocking
Introduction:
Geofence is a virtual geographical perimeter or barrier made for a specific location, i.e your office. By setting a Geofence in TimeTec TA, employees can clock their attendance using GPS clocking only if they are within the permitted area. However, on certain occasions, employees’ clocking might take place outside of the Geofence perimeter. Therefore, in order to cater to such events, we’ve prepared a guide on how to manage the Geofence feature for Out Of Area Clocking. Below are the steps required to carry out the process:
Process:
A) Configure The GPS Geofence Settings
Firstly, you will need to configure your employees clocking boundary limit in order for the employees to clock their attendance via GPS clocking within the permitted area. You may refer to the link provided below for guidance on how to configure the GPS Geofence settings:
B) Configure the Approval Method for Out Of Area Clocking
For System Administrator -
1. To configure the Approval Method for Out Of Area Clocking, please go to User > Manage Approval Rules > Add > Out of Area Setting

2. Set Users for the Approval Rules -
Name the Approval Process and select the application where the Approval Process will take effect, which in this case will be TimeTec TA. Then, select the Users to apply onto these Approval Rules. (Note that there are three options to for the selection of the users: Select Only Particular Organization Structure, Select Only Certain Users or Select All Users.)


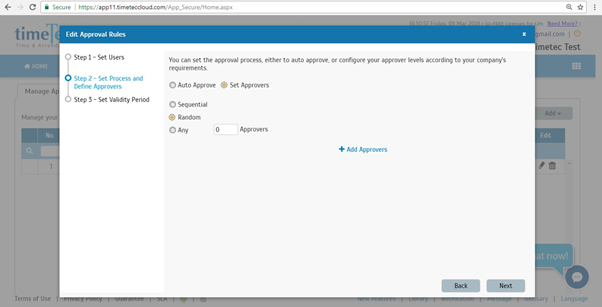
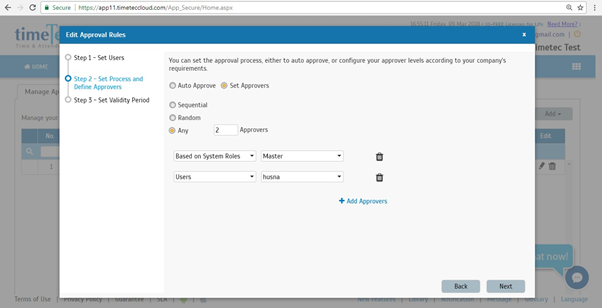
3. Set Approver(s) for the Approval Rules -
System Administrators can choose either Auto Approve if no approver is needed or select Set Approvers if he/she requires a specific personnel to execute the approval process. For Set Approvers method, note that there are three options that can be selected by the System Administrators:
- Sequential
- Random
- Any Approvers
i) Auto Approve (Automatic approval without the need for an approver)

ii) Sequential Approval (A multilayer approval that requires all level of users to approve before the request can be processed. Note that this procedure will require the first level of approvals to be carried out before moving on to the next level)

iii) Random Approval (Requires all selected users to approve but without any multilayer order)
iv) Any Approval (Does not require all selected users to approve as long as the permission is received from any one of the selected number of users)
4. Set Validity Period for the Approval Rules -

Next, the System administrator will have to configure the validity period for the approvers to respond. The Validity Period can either be set based on the number of hours or number of days. For example, if the period is set as 4 days, the application that has not been approved within 5 days will then expire.
5. Once the rules have been submitted, you will see that the approval rules are now added and will be initiated on the effective date.

C) Applicants: User Request for Out of Area Clocking Approval
1. Once the approval rules have been set, users can start applying for Out Of Area Clocking approval.
Login to your TimeTec TA App > verify by using GPS clocking > click Clocking > provide reason for the Outside permitted clocking > Submit
Remark: The request can only be applied by using GPS clocking and only if the users verify their attendance outside of the permitted area. 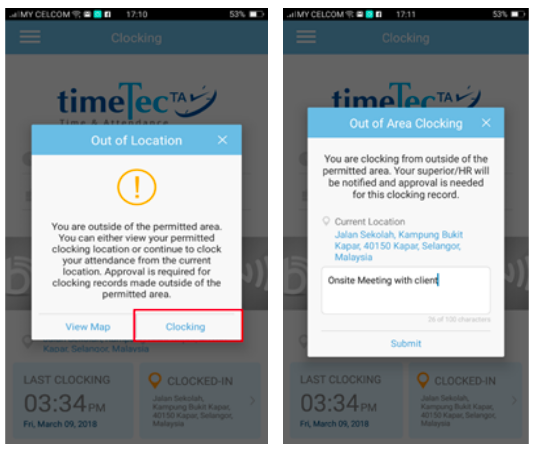
2) Users can then view their Out of Clocking Area Request Status Details either via Web Browser or Mobile Application.
Web Browser:
Login to the user credential > Approval > Request > The status will be shown in this tab whether it is “Approved”, “Pending”, “Rejected” or “New” if no one has approved the request.

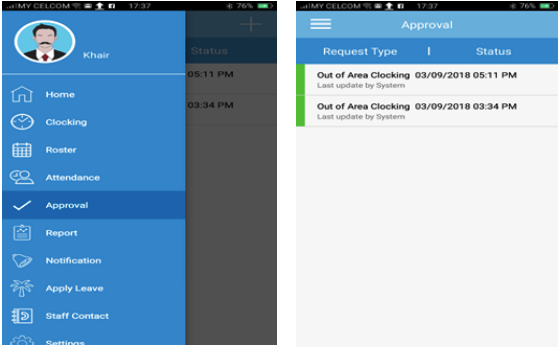
Mobile Application:
Go to system option > Approval
D) Approver
Within the Approver view, go to Approval tab to view any New requests. Click at the Status to view the request details. Note that Approvers can also view the request in the Notification feature.
Set Approvers
1. Sequential Approval
i) For Sequential Approval, the approver will need to follow their turn in order to approve the request. The system will notify the admin if it is not yet their turn to approve the request.

ii) The approver with sequence 2 will view the approval status as ‘Pending’ in the Approval section after the approver with sequence 1 has approved the request.


iii) Once the approver with the last sequence has approved the request, a pop-up message will appear to notify that the request has been approved and the request status will be changed to ‘Approved’.


2. Random Approval
For Random Approval, all the approvers will need to approve the request before the request status can be changed to ‘Approved’. Note that the approvers do not need to wait for their turn in order to approve the request and if any one of them rejects the request, the request status will then change to ‘Rejected’.


3. Any Approval
For Any Approval, the request status will change to ‘Approved’ if any of the approver has approved the request. Note that only if all the approvers has rejected the request, will the status of the request then be changed to ‘Rejected’.

4. Auto Approve
The request will be auto approved by the system without any permission required from the approvers.

Related Articles
Set your Clocking Boundary with TimeTec TA GPS Geofence Feature
Introducing our latest option for GPS clocking in TimeTec TA: Geofence. What is Geofence? Geofence is a virtual geographical perimeter or barrier made for a specific location, i.e your office. By setting a geofence in TimeTec TA, employees can clock ...How To Add New User to TimeTec TA (Geofence User)
Introduction Time attendance, scheduling management & work from home are effective solutions for the modern workforce. The TimeTec TA automates your time data collection process and seamlessly integrates it with biometrics identification devices. ...Guide for TimeTec TA Mobile Clocking For Multinational Users
Introduction TimeTec TA mobile clocking is a feature for users to perform clocking via the application using their mobile smartphone regardless of the location they are at. There is a default time zone that the TimeTec TA system follows. Therefore, ...TimeTec TA Mobile App - Personal Clocking
Introduction To cater to employees who are always on the go and those with flexible working arrangements, TimeTec TA offers 4 different ways for users to clock their attendance from a smartphone. The options available for personal clocking in ...Start WiFi Clocking With TimeTec TA App
Introduction Within TimeTec TA, users previously had 3 different ways to personally clock their attendance from a smartphone. Following our latest release we are notching that up to 4, by offering one more clocking method to users, known as Wifi ...