TimeTec Leave - Using Prorated Leave Balance for New Hire
Introduction
Prorated balance is a feature available in both leave policies and length of service accruals, where the number of leave days is divided based on service duration.
Take this scenario for an example. If your company's leave policy allocates 12 annual leaves a year in January, and you hired a new employee in October, you can use the prorated balance to allocate a percentage of his yearly allowance to the remainder of the calendar year.
*Prorated Balances are calculated using the user's Joined Date. If there is no available Joined Date, the current date is the Joined Date.
Hence, the new hire prorated leave balance can be set to four types of rounding on top of the standard.
1. Standard prorated
2. Rounding up to a full day
3. Rounding up to a half-day
4. Rounding down to a full day
5. Rounding down to a half-day
A. Default Standard Prorated
By default, the calculation for percentage Standard Prorated given by TimeTec explained as per below:

B. Prorated leave setup
1. Go to TimeTec Leave > Leave Settings > Prorated Leave Balance > Add

2. Set the “Prorated Leave Balance Name” > click on “Set the percentages uniformly”
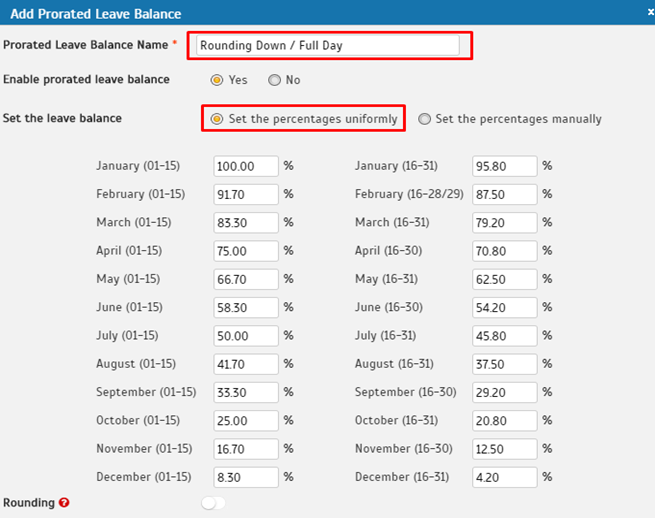
3. On the bottom of the page, click on “Rounding” icon > Choose “Rounding Type” Round up or Round down and “To the Nearest” Full day or Half Day > Submit.
Round up to the nearest half: will add a half-day to your latest leave balance.
E.g.: Full working Hours: 8, Leave balance: 5 days 2 hours and 30 minutes.
Round up to the nearest half day = 5 days 4 hours
Round up to the nearest full day: will add one day to your latest leave balance.
E.g.: Full working Hours: 8, Leave balance: 5 days 2 hours and 30 minutes.
Round up to the nearest full day = 6 days

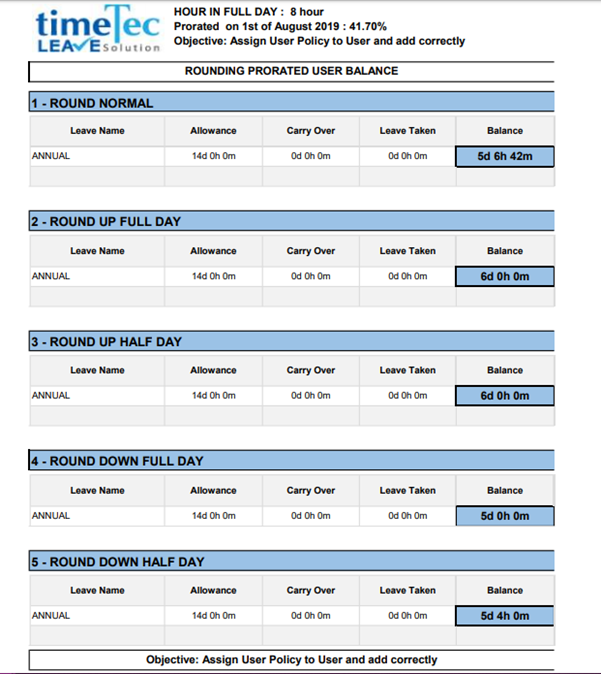
C. Rounding Example:
You can refer to the picture below for Rounding examples:
D. How to apply Standard prorated into Leave Policy
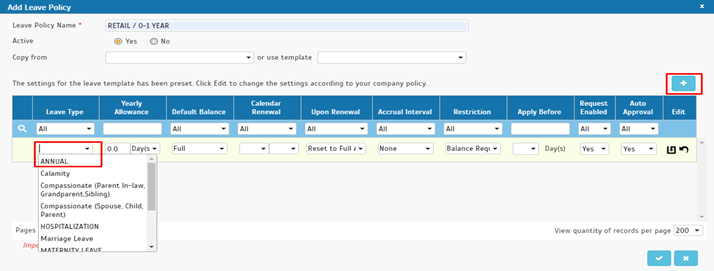
1. Go to TimeTec Leave > Leave Setting > Leave Policy > click on (+) icon.

2. Click on (+) to add new leave type into policy.
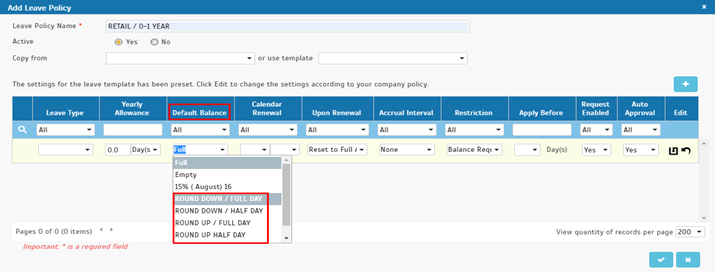
3. On the Default Balance tab you can choose all the Prorated rounding that has been set before
Note: If some of the screenshots or steps viewed here are different from the ones in the current system, this is due to our continuous effort to improve our system from time to time. Please notify us at info@timeteccloud.com, we will update it as soon as possible.
Note: If some of the screenshots or steps viewed here are different from the ones in the current system, this is due to our continuous effort to improve our system from time to time. Please notify us at info@timeteccloud.com, we will update it as soon as possible.
Related Articles
Using Prorated Leave Balance Rounding by Days into Leave Policy Setup
Introduction Prorated balance is a feature available in both leave policies and length of service accruals, where the number of leave days is divided based on service duration. Go to Leave Settings > Prorated Leave Balance > Click on the “Add” ...Prorated Leave Calculator for Resignation
Introduction This feature calculates the leave balance accurately for resigned users. By using the prorated leave calculator, the HR will be able to get hold of the last employment date of a user. Process 1. Go to User > Manage User > Leave setting > ...Using TimeTec HR (Leave) App for The First Time
Introduction TimeTec HR is a new app by TimeTec that consolidates several TimeTec solutions: Attendance, Leave, Claim, Access and Payroll, into one super app. This article will guide you on how to use the leave module in TimeTec HR. Benefit By ...TimeTec Leave - How to Configure Accrual Interval in Leave Policy to Allow Monthly Earned Leave Balance
Introduction Some company regulations provide a prorated leave balance from the full yearly entitlement based on staff’s joining date, while others practice prorated calculation earned monthly. However, the monthly earned leave is usually calculated ...How to Import User Leave Balance Using Excel in Timetec Leave
Introduction Leave balance is essential information for all employees, and some of them are sensitive about their leave balance. However, manual updates will not automatically provide the leave balance for everybody, especially for a company with an ...