Installation Wiring Diagram and Settings for R3 and R2c
Introduction
With the new release of our latest products, some terminal installations are different from our previous guides and diagrams. Below is the full installation wiring diagram and settings to connect R3 with R2c.
Benefits
Process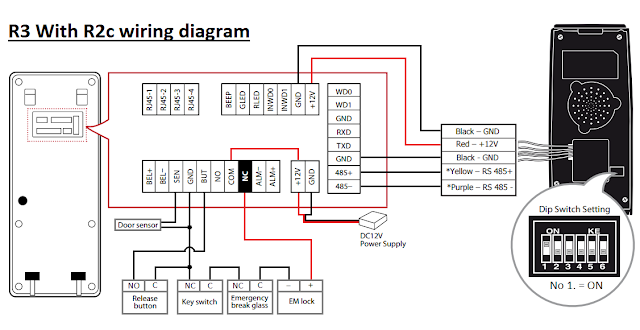
If the R2c does not respond during installation:
Check on the below R3 settings:
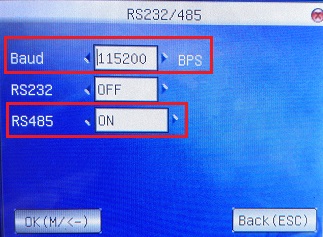
1. Make sure the settings in R3 are set as below.
Baud : 115200 BPS

Check on the R2c settings:
1. Check the Dip Switch settings below: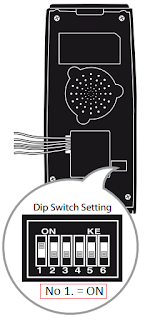
With the new release of our latest products, some terminal installations are different from our previous guides and diagrams. Below is the full installation wiring diagram and settings to connect R3 with R2c.
By pairing R3 with R2c, you can have a totally secured biometrics with having to invest in two master terminals. All verifications and data storage are managed by the master terminal. You can also control the employee movements by implementing the Anti-PassBack settings when you pair the R3 with R2c.
Process
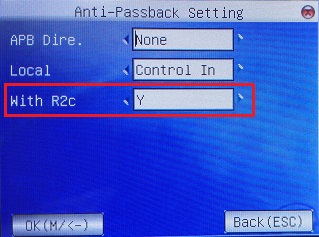
Settings at R3:
Enable the R2c setting at the R3: Press Menu > User Management > Access > Anti-Passback Setting > With R2c > Set to Y
If the R2c does not respond during installation:
1. Make sure the settings in R3 are set as below.
Baud : 115200 BPS
RS232 : OFF
RS485: ON2. Make sure the R3 Fingerprint algorithm is BioBridge VX 10.0: Press Menu > System Info> Device > Alg Version FTFinger VX10.0
**If you found that the Alg Version is FTFinger VX9.0, you need to change it to VX10.0: Press Menu > System > System > Alg Version > FTFinger VX10.0
1. Check the Dip Switch settings below:
Note: If some of the screenshots or steps viewed here are different from the ones in the current system, this is due to our continuous effort to improve our system from time to time. Please notify us at info@timeteccloud.com, we will update it as soon as possible.
Related Articles
Installation Diagram for R2 (FEM565) - R2c with New AdapTec Plus
With the new release of our latest products, terminal installation might differ from our previous guide and diagram. Below is a full installation wiring diagram for R2 (FEM565) – R2c with the New AdapTec Plus. If the R2c does not respond upon ...R2 (565) – R2 (565) Master - Slave Wiring Diagram & Settings
Previously we have discussed on how to modify the setup for 2 master terminals to use it as master-slave terminals. You can read the full article here. Today we will be demonstrating how to connect the 2 units of R2 (565) terminals to work as ...R3 and R3c With AdapTec X Installation Wiring Diagrams
Introduction R3 is a fingerprint reader from FingerTec that caters for door access and time attendance verification. R3 comes with multiple verification methods such as fingerprint, card, and password. For a back-to-back biometrics’ security measure, ...TC20 Door Access Wiring Diagram
Introduction TC 20 New lineup device for TimeTec HR solution that can cater to attendance records and access control needs for any organisation. It's been equipped with facial recognition, touch-less attendance record and access equipment that fits ...Wiring Installation for Face Id X & Face Id 2 (In/Out) Without Using Adaptec Plus
INTRODUCTION The combination of Face ID X and Face ID 2 can be used together without Adaptec Plus. There are differences in wiring configuration if clients use Adaptec Plus as the power supply and door access controller, compared to using only Face ...