Installation Guide for Face ID 6
Installation Guide for Face ID 6
Face ID 6 series is the all-new face and palm verification terminal equipped with the latest facial recognition technology, an all-rounded upgrade that results in greater performance and reliability. Not only is it affordable, but also a powerhouse in access control & time attendance, suitable for any industry looking to strengthen their security.
In this chapter, we will look at the standard installation for this device.
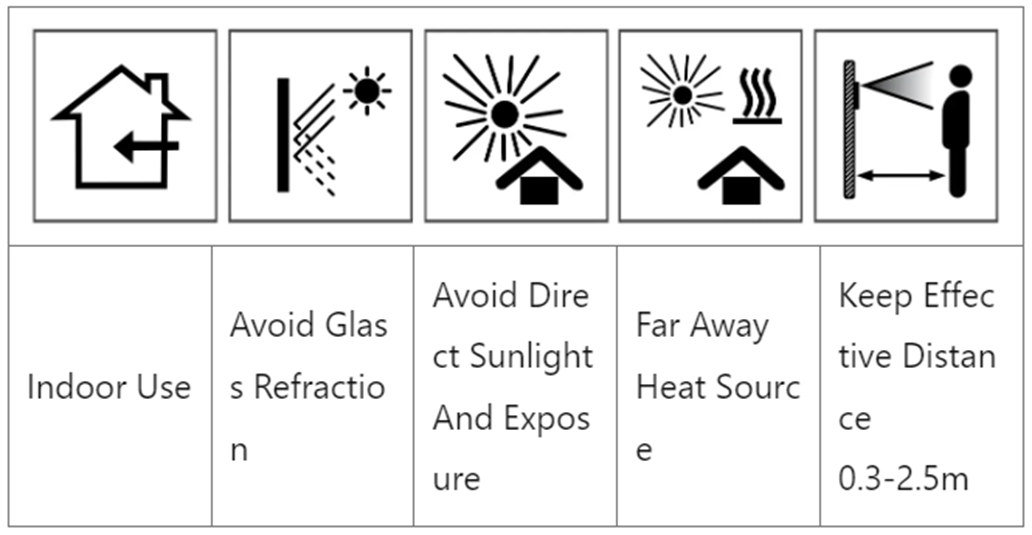
Step 1: Determine the installation location.
· Avoid installing the terminals in locations that have come into contact with strong light source (e.g direct sunlight, spotlight, fluorescent light, etc);
· Avoid installing the terminals in locations with high moisture or condensation levels in the air
· The recommended installation height of the terminal from the ground to the camera is 1.5 meter.
Step 2: Mount Terminal on a Wall
1. Avoid strong sunlight
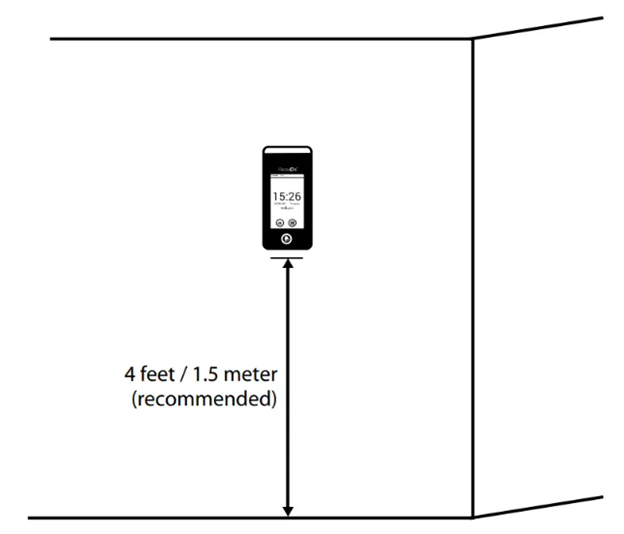
2. Install the terminal 1.5m from the ground level (measure the height from the ground to the face camera)”
After measuring the height accordingly and making relevant markings on the wall, drill the screws into the wall to secure the back plate.
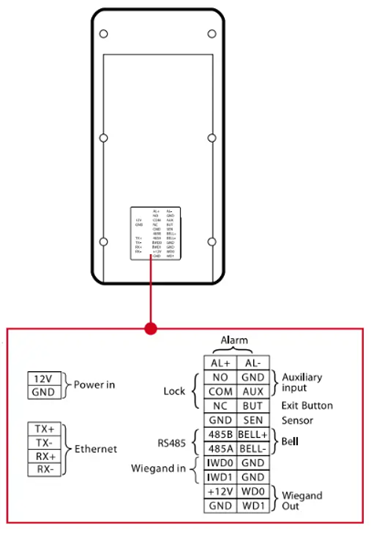
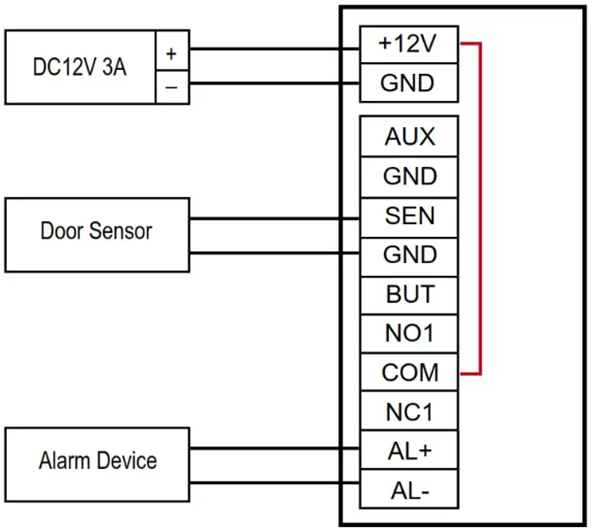
Step 3: Wiring for Power Supply
Use power cables (black and red) to connect to a linear power supply with specifications of 12VDC 3A to Power Port.
Door Lock Connectors

Door Lock System Wiring Diagram;
Diagram 1, Normally Close (NC);

Diagram 2, Normally Open (NO);
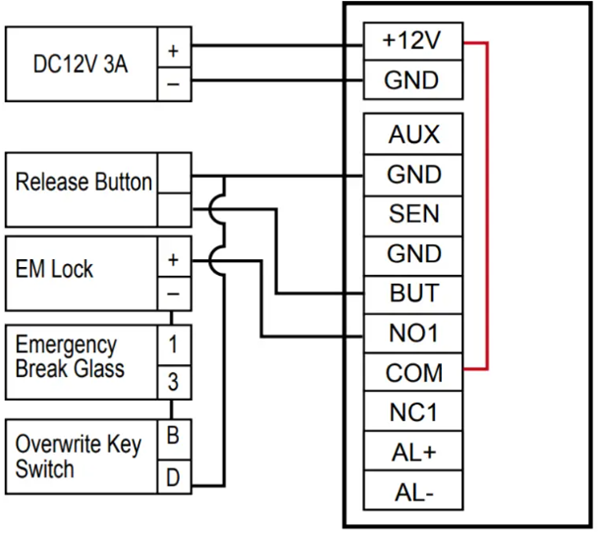
Diagram 3, Other Accessories;
Step 4: Setting Up Data Communications
(Skip this step if you are using a USB flash disc to transfer data)
The data communication ports are positioned at the rear of the terminal, please refer to the diagram shown on Step 3 to determine the wiring. Plug the communication jacks (TCP/IP) to the corresponding ports remarks as Ethernet.
TCP/IP – LAN Connection
For TCP/IP connection, plug the special RJ45 jack into the TCP/IP (LAN) Port of the terminal. Connect the other end (normal RJ45 jack) to the local area network hub or a PC. Configure the device ID, IP address, subnet mask, and Gateway on the terminal.
Step 5: Finalizing the installation
1. Check that all cable connections are done correctly.
2. Attach the terminal to the corresponding back plate and tighten the screws to fix the terminal to a wall.
3. Switch on the power to the terminal.
4. Start using it.
Note: If some of the screenshots or steps viewed here are different from the ones in the current system, this is due to our continuous effort to improve our system from time to time. Please notify us at info@timeteccloud.com, we will update it as soon as possible.
Related Articles
Installation Guide of Face ID 4d (FMM) With AdapTec Plus
Introduction FingerTec Face ID 4D is now supplied with a new version of the coreboard (FMM) that comes with new hardware parts and new exterior parts. To ensure the reader connects with secured wiring, we suggest using the AdapTec Plus connection. ...FACE ID 6 Wiring for Access Control
Introduction Face ID 6 is the latest addition to the access control devices, which boasts multiple verification methods including face recognition, card, password and palm verification. This article will guide you on the installation of the Face ID 6 ...TimeTec AWDMS Hardware Requirement and Installation Guide
INTRODUCTION The FingerTec latest facial recognition models such as Face ID 5 series and Face ID 6 use new firmware and architecture that requires a new SDK set to ensure seamless integration of hardware and software. Therefore, TimeTec introduces ...Installation Guide for the New Ingress v6.0.0 MySQL Software with Middleware
We are pleased to announce the release of the new Ingress software v6.0.0 with MySQL and Middleware support, which eliminates the need for separate AWDMS software. HARDWARE REQUIREMENT (Compulsory for the latest device models: Face ID 5, Face ID 6, ...WiFi Configuration Guide For FingerTec TA100C
Introduction: WiFi is considered as one of the most required technological aspects for a modern lifestyle. As such, there are many WiFi compatible devices offered in the market today that can connect to the Internet. The WiFi option also allows for ...