Ingress/TCMSv3 - Flexi Schedule Configuration for Federal Ministries and Departments of Malaysia 2019
Introduction
Recently, the Public Service Department (PSD) of Malaysia announced that civil servants could opt for flexible working hours.
Fortunately, in FingerTec software, Flexi Schedule is being offered as one of the schedule options for users, and they can configure it quickly based on the schedule assigned for the civil servants as shown below.

Process
1. To add Flexi Schedule, go to Attendance tab > Clocking Schedule > Add Clocking Schedule > Select ‘Flexi’ for the Work Schedule field.

2. For civil servants working in Kuala Lumpur, Putrajaya, Selangor, Perak, Sabah, Sarawak and Perlis:
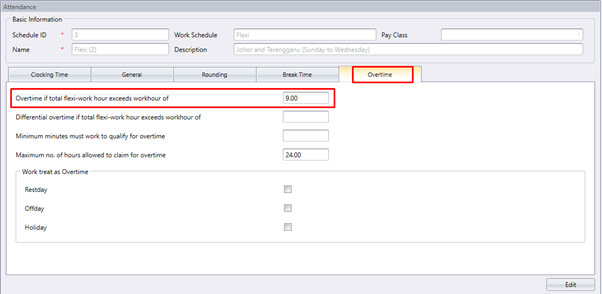
i) Insert the latest time allowed to start work, which at 08:30 AM into the IN column and set the total hours of work per day which is 9 hours in the ‘Overtime if total flexi-work hour exceeds workhour of option.


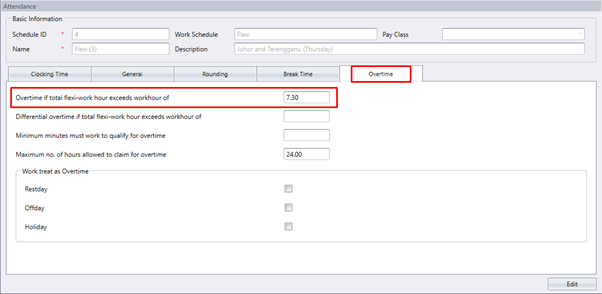
3. For civil servants working in Johor and Terengganu, you need to add two Flexi Schedules since the total hours of work per day for Sunday to Wednesday and Thursday are different.
i) Sunday to Wednesday: Set the clocking time only for Sunday to Wednesday and set the total hours of work per day same as above.

ii) Thursday: Set the clocking time only for Thursday and set the total hours of work per day to 07.30 hours.

4. To add Group Duty Roster, click on Group Duty Roster > Add Duty Roster > Select ‘Weekly’ for the Roster field.

i) For civil servants working in Kuala Lumpur, Putrajaya, Selangor, Perak, Sabah, Sarawak and Perlis:
Edit > Auto Schedule > Make sure the day type is correct and assign the same schedule for all days > OK & Save. Then, assign users for this roster.

ii) For civil servants working in Johor and Terengganu:
Edit > Auto Schedule > Make sure the day type is correct and assign the same schedule for all days except Thursday which you need to select the schedule created especially for Thursday > OK & Save. Then, assign users for this roster.

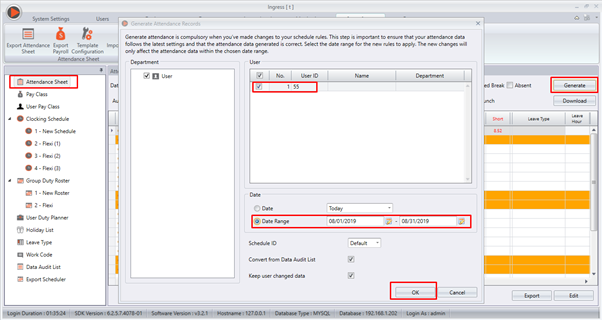
5. Finally, go to Attendance Sheet > Generate > Select users > Select the correct date range > OK in order for the data to display accordingly.
Note: If some of the screenshots or steps viewed here are different from the ones in the current system, this is due to our continuous effort to improve our system from time to time. Please notify us at info@timeteccloud.com, we updates it as soon as possible.
Related Articles
Ingress/TCMSv3 - Flexi Schedule Configuration for Federal Ministries and Departments of Malaysia 2019
Introduction Recently, the Public Service Department (PSD) of Malaysia announced that civil servants could opt for flexible working hours. Fortunately, in FingerTec software, Flexi Schedule is being offered as one of the schedule options for users, ...Ingress & TCMS V3 - Setting Up Flexi Schedule with 1 Pair Clocking Setup
Introduction In some cases, the management can set up Flexi schedule to capture 1 -pair of record (in and out only) under Ingress & TCMS V3 software, so the system only captures the first in and last out. However what happens if the employee ...Overnight Flexi Hour Clocking Schedule in Ingress & TCMS V3
Introduction Flexi Clocking Schedule is a working schedule that does not include any late-ins, early outs or overtime. This is suitable for groups of workers where their working time is not fixed. Benefit The use of flexible working schedule ...Working Hours Calculation with Overnight-Flexi Schedule in Ingress & TCMS V3
Introduction In Ingress & TCMS V3, there is a Flexi clocking schedule that supports flexible working shift. It also can be used to keep records of users, who work more than a shift within a day. Benefit There might be some users whom are confused on ...Weekly-Schedule Configuration for Double Break Time in Ingress or TCMSV3
Introduction There are many companies that practice double break time and some of their administrators are not familiar on how to configure this schedule in Ingress or TCMSv3. So in this tips, we will provide you the steps that are required to ...