i-Account - How to Perform First Time Bank Reconciliation
Introduction
For i-Account users, reconciling the bank records in the system against the actual bank statement is an important monthly task. Admins can use the bank reconciliation function in the system to complete this process.
Refer below for a guide on starting the first month bank reconciliation.
How To Perform First Month End Reconciliation
- From: Choose the date of the earliest transaction in the system. For example, if the earliest transaction is for the migration date of June 30th 2021, you can select that date or even much earlier such as January 1st 2020.
- To: Choose the reconciliation date, e.g., July 31st 2021.
Note: Do not key in any value for Beginning Balance (leave as 0.00 for first month reconciliation). This balance is auto brought forward from the previous month reconciliation.
7. Scroll down to view the list of transactions within the selected date range.

9. Next, reconcile for the first month transactions. Every time you tick (untick) a checkbox, the page will be auto-saved.
ii: Enter any receipts or payments (e.g., bank interest/ bank charges) appearing on the bank statement, which have not yet been recorded into the system record.
iii: Rectify any differences found for a transaction between the system and bank records (e.g., wrongly keyed in values, duplicate entries etc.).

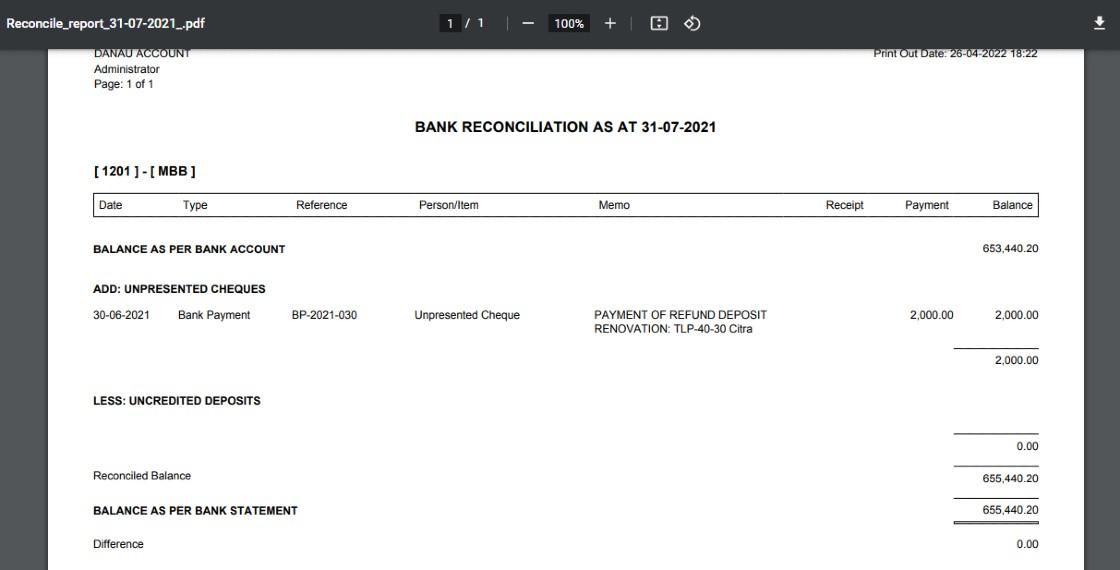
10. Difference column should be “0.00” if bank reconciliation is completed.
11. After completing the reconciliation, you can download the Bank Reconciliation Statement by clicking on “Bank Reconciliation Report”. The same statement can also be generated at Reports > Banking > Bank Reconciliation Report.
Related Articles
i-Account User Guide – Bank Reconciliation
Introduction Every time you receive a bank statement, it is important to monitor the balances and compare them against the records processed in the system’s Bank Account. Perform a reconciliation by ticking the checkboxes for entries that match those ...i-Account User Guide Pages
Billing, Account Statement & Notice Generate Quarterly Billing (SCI Statement) Automatically with Auto Recurring SCI Feature Link How to Charge Late Payment Interest (LPI) Link How to Issue Direct Invoice Link How to Upload Water (or Electricity) ...How to Add a New Bank Account
Introduction The steps below explain how to add a new bank account in the system. This process is also applicable during an account handover between a Developer, JMB, or MC, when a new bank account needs to be created and linked for proper financial ...i-Account User Guide – Virtual Account Number
Introduction If you are subscribed to a Virtual Account service provided by your bank, i-Account has a feature that supports the import of these numbers for display on invoices. Under this Virtual Account arrangement, the bank provides a range of ...How to Enter a Bank Payment (Payment Voucher) - Pay Third Party / Miscellaneous
Introduction The function for cash book/GL Payment entry (used to record payment to parties other than Accounts Payable) is located at Banking & General Ledger module. Admin can directly issue a payment voucher (Bank Payment transaction type) for ...