How To Turn On Resident Approval Rules For Management Via i-Neighbor Web
This article explains the procedures for the management to approve the owner invitation to his family members or tenants as residents in a neighbourhood via i-Neighbour Web Application. These procedures prevent the resident from inviting an unwanted or uninvited person. A resident needs approval from the management before they can send an invitation link to the invitees. Below are some of the steps that you can take to enable the Resident Approval Rules.
Here are some steps:
Go to Neighborhood> Manage Unit.
Choose Resident Listing tab and click on the setting button on the right screen.
Click 'Enable' to turn on the Resident Approval Rules.
A successful message will be prompted.
Add Resident procedure. Click OK to proceed.
Note: Owner has to contact the management office for further action.
Click the Approval button to view the list of the submissions.
Select Unit No. and choose whether to approve or reject the submission.
Once the management has approved the submission, a successful message will be prompted.
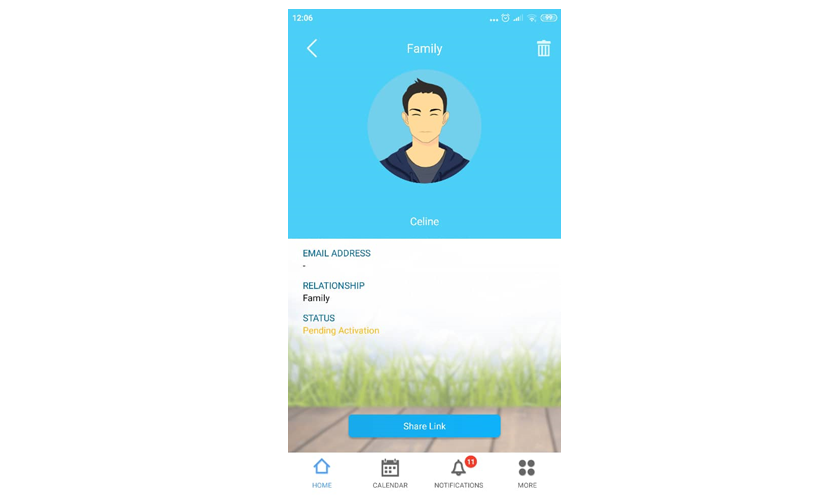
The submission status will be changed to "Pending Activation".
The owner then can share the link to his invitees and ready for account activation.
If you are still having problems after completing all of the steps stated above, please contact us via support@i-neighbour.com.
Note: If some of the screenshots or steps viewed here are different from the ones in the current system, this is due to our continuous effort to improve our system from time to time. Please notify us at info@i-neighbour.com, we will update it as soon as possible.
Related Articles
How To Customize Visitor Details via Web
The management can customize the information required from their visitors and therefore, we have prepared a short guide on this topic. Steps required: 1. Login to i-Neighbour admin web portal. Select Neighbourhood > Settings > Visitor Settings. 2. ...How to Invite Family Members/Tenant and Get Management Approval
This article aims to teach users how to invite family members or tenants and obtain management approval. Steps and Procedures 1. Launch the i-Neighbour App. Click on the links below to download your corresponding i-Neighbour App: a. i-Neighbour in ...How To Invite Residents/Family Members Into i-Neighbour Web
In the i-Neighbour Web, management is the supervisor who keeps every owner in residence. Management can invite owners' family members to use the i-Neighbour application. For example, management can invite people who live in the same unit to use the ...How To Invite Tenant Into i-Neighbour Web
In the i-Neighbour Web, management is the supervisor who keeps every owner in residence. Management can add the primary tenant (first tenant) and some other tenants (if he or she leases the house to several people). This document describes the ...How to Make Payment via i-Neighbour Web
This article will be guiding you on making payment through the i-Neighbour Web. 1. Go to My Account > E-Billing > Invoice & Payment 2. To view the invoice, click on the icon in the red box. 3. Owners can view details just by clicking on the PDF logo ...