How To Enable GPS and Notification Features (For iOS and Android)
This article aims to teach users how to enable GPS and notification features for both iOS and Android.
If you are intend to use the panic button in the future, these are the steps to enable the notification and GPS feature for i-Neighbour on your phone.
GPS - Steps Required:
Settings > Installed apps > i-Neighbour > App permissions > Enable location
GPS Setting for Android
1. Go to Settings.
2. Find Installed apps.
3. Select i-Neighbour.
4. Find and select App permissions
5. Enable the Location to activate the GPS function for i-Neighbour.
GPS Settings for iOS
1. Click on Settings.
2. Select i-Neighbour.
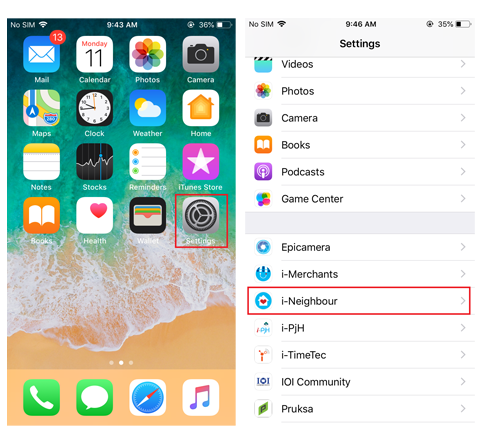
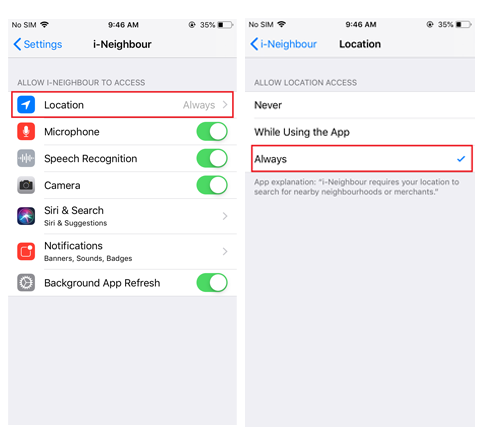
3. Tap on Location to open the location settings.
4. Choose Always for Location Access
Notifications - Steps Required:
Settings > Notifications & status bar > App notifications > i-Neighbour > Enable all
Notifications Setting for Android
1. Go to Setting.
2. Find Notifications & status bar.
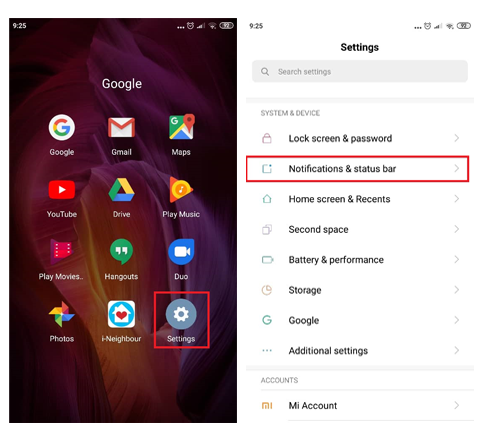
3. Tap on the App notifications to see the apps list.
4. Search and select i-Neighbour.
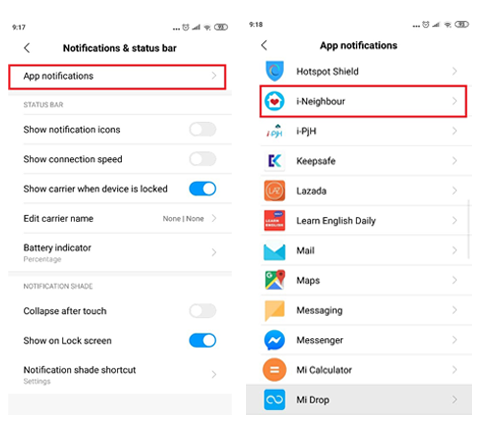
5. Enable all functions to receive all notifications related to i-Neighbour.
Notifications Settings for iOS
1. Go to Settings.
2. Select Notifications.
3. Choose i-Neighbour.
4. Turn on all functions to receive all notifications from i-Neighbour.
Note: Every Android smartphone has a different user interface, hence the screenshots presented above might be different from your smartphone UI.
If you are still having problems after following the given instructions, please contact us via: support@i-neighbour.com
Note: If some of the screenshots or steps viewed here are different from the ones in the current system, this is due to our continuous effort to improve our system from time to time. Please notify us at info@i-neighbour.com. We will update it as soon as possible.
Related Articles
How to Enable Visitor Notification Sharing in Your Unit
By default, visitor notifications will only be sent to the Resident the Guards checked the visitor under. This article aims to guide Unit Owners to enable Visitor Activities Sharing among all the residents of their unit. Step 1: Select "More" Step 2: ...Owner’s Notification for Visitor Check-in and Check-out
When a visitor has been checked-in by a security guard, the owner who is receiving this visitor will get a pop-up message to notify that he has a visitor. If the owner clears the notification bar without looking at who’s coming to their house or did ...How to Enable Pop-Ups for i-Account site
Introduction For new i-Account users, you may encounter an instance of Google Chrome blocking pop-ups from automatically showing up on your screen when you try to print an invoice, receipt or payment voucher from the system. The address bar will be ...Enable Invoice Sharing with Residents in the Same Unit
This article aims to teach owners how to share invoices to all residents in the same unit. Process 1. Login as Owner 2. Go to E-Billing 3. Enable Invoice Sharing. 4. Click Share to confirm 5. Invoice Sharing option is enabled 6. Family members now ...How to Enable Manual Approval for New Residents (How to Approve Residents)
1. Under Community click Manage Unit. 2. Click on Settings icon. 3. Click Edit. 4. Enable "RESIDENTS ADDED BY UNIT OWNER REQUIRED MANAGEMENT APPROVAL", then click Save. How to Approve New Residents and Tenants 1. Under Community click Manage Unit. 2. ...