How To Create Visitor Passes
This article will show you how to create the visitor pass in the i-Neighbour Cloud-based software (By Admin).
Benefits
1) The visitor pass created from i-Neighbour cloud-based software comes with a QR Code. With the QR Code, the check-in/out process is faster than the manual check-in/out.
2) No hassle to create a visitor pass template because the existing template already created by the programmer, so an admin only needs to insert the essential data to create the visitor pass.
3) We offer two types of visitor pass size A4 or A6.
Process
How to create Visitor Pass using i-Neighbour
1) Under Community > Settings, click on Visitor Setting.
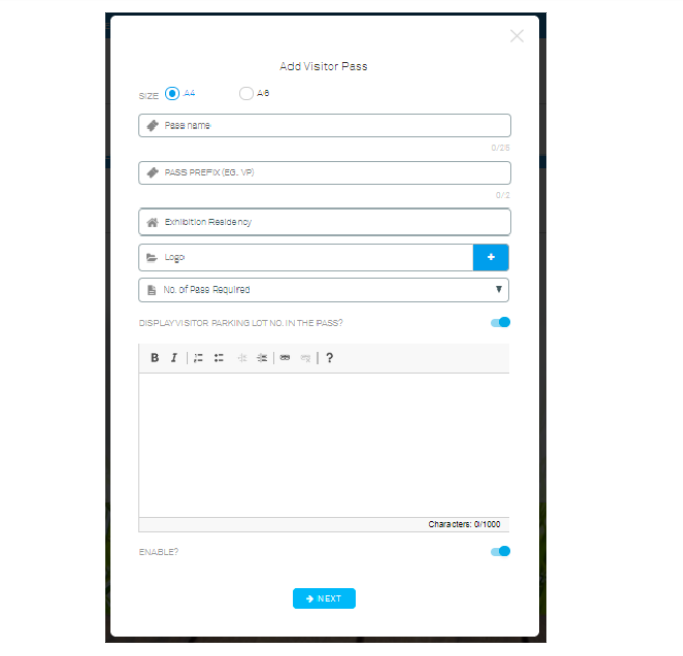
2) Click on Visitor Pass, then click Add Pass.
3) Fill in all the required information
Select size > Insert pass name > Pass prefix (For example Contractor set as “C”) > Neighbourhood Logo (If ignored, in the Visitor pass shows i-Neighbour logo) > No. of pass required (Min 20 / Max 200) > Display parking Lot no (You can set it as OFF if no parking lot number) > Set visitation rules > Enable ? (Default is enable) > Click Next to continue the process
4) Click ‘Submit’ to proceed, and a visitor pass should be available in the system.
The Admin can view the created visitor pass by clicking “View”, and can click ‘Edit’ to change any details.
5) This is an example of an A6 size Visitor pass created from i-Neighbour Cloud-based software.
If you are still having problems after completing all of the steps stated above, please contact us via support@i-neighbour.com.
Note: If some of the screenshots or steps viewed here are different from the ones in the current system, this is due to our continuous effort to improve our system from time to time. Please notify us at info@i-neighbour.com, we will update it as soon as possible.
Note: If some of the screenshots or steps viewed here are different from the ones in the current system, this is due to our continuous effort to improve our system from time to time. Please notify us at info@i-neighbour.com, we will update it as soon as possible.
Related Articles
Visitor Registration - Making Visitor Pass Compulsory
This feature lets the admin select whether Visitor Pass should be compulsory or not. After enabling this option, the i-Vizit application (Guard House tablet) will prevent a security guard from pressing the check-in button without selecting a visitor ...How to Create Announcements
1. Under Community, click on E-info then Announcements. 2. Click on the + icon. 3. Select the recipients and upload an optional cover photo, click Create when done: i) Select Recipients ii) Select viewers: a) Unit Owner & Residents (Family ...How to Create E-Forms
Management can create forms for Residents to view and fill up on the mobile app and web portal. 1. Under Management, click on E-Forms. 2. Click on Created Forms then Create New. 3. Admins will be redirected to a Build Form page, whereby you can start ...i-Neighbour / i-Vizit - Blacklist Visitor
Blacklisting visitors can ensure that the same person will not be permitted into the premises when he or she re-attempts to re-enter your neighbourhood. However, please do ensure a reasonable excuse is submitted for this action. This is to prevent ...How to Insert Visitor Check In Remark
1. Tap "Checked In Visitor" on the home screen. 2. Select Visitor. 3. Tap on Settings icon. 4. Select "Check-In Remark". 5. Type in remark and tap "Continue" when done. 6. Tap OK to finish.