How to Change Background Image in TA500
Introduction
The TA500 default background image is shown as below. However, this picture is not permanent and you can change it to your preference. Let’s learn how to do it.

Benefits
You can make TA500 your own by inserting your company’s preferred image to the display for example your company’s logo, your company’s cause such as environmentally friendly message and many more. You can change this page as you like to suit your company’s requirements.
Process
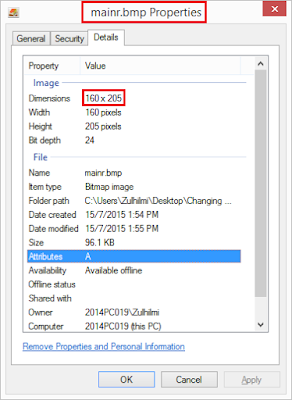
1. To change the TA500 default screen to your preferred imagery, you must make sure your image fulfill below conditions : 1. Image with size of 160x205.
2. In bitmap image type.
3. Rename image as mainr.bmp
4. Mirror the image and rotate it 180 degrees (refer explanation below)
5. Make sure the pendrive is empty (doesn't has others picture or files)
Refer to the diagram below for the image properties.
Note: Make sure that you mirror the image and rotate it 180 degrees, if you forgot to do so, the image will appear backward and tilting.
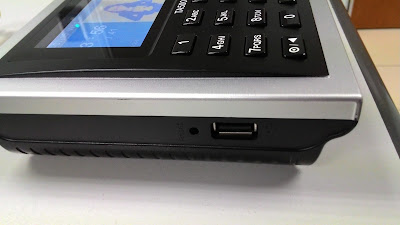
2. Double check the image name and the dimension of the image. Save the image to your USB pendrive and plug in the pendrive to the TA500 USB port on the left side of the terminal.
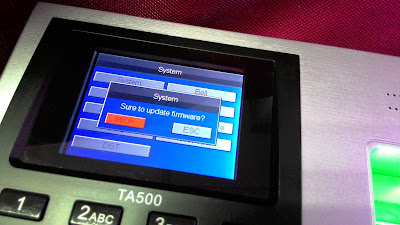
3. Next, hold the Menu button to access to the Menu page.
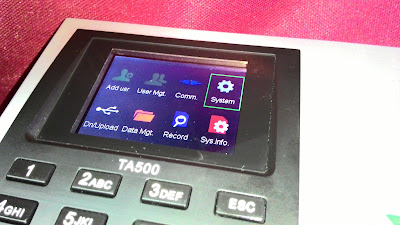
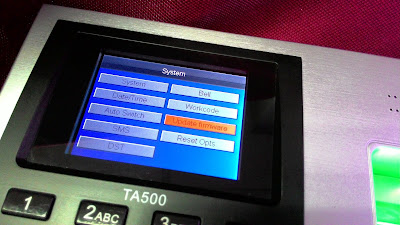
4. Select System and choose update firmware from the system page.
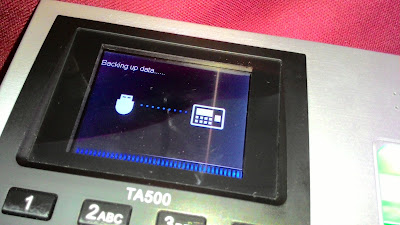
6. After that the system will execute the update and you can see the below picture during the update process.
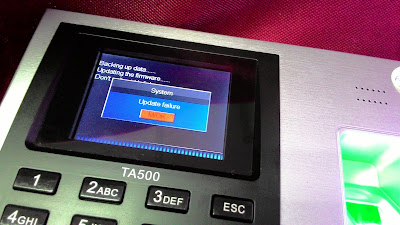
7. Once done, system will pop up an error message as per below, stating that the update failed. Press OK to skip this message. The reason to this error is the TA500 is unable to locate the update files required for the firmware update but only able to find the image file for the update. However, the background image has been updated to the terminal successfully.
Note: If some of the screenshots or steps viewed here are different from the ones in the current system, this is due to our continuous effort to improve our system from time to time. Please notify us at info@timeteccloud.com, we will update it as soon as possible.
Related Articles
TA300 Change of Algorithm
The TA300 is a portable fingerprint terminal for time attendance system. Not only it is wireless, it also comes with an internal battery that could last for a maximum of 5 hours. The TA300 is specially designed for small and medium sized businesses ...Import Roster Function from User Duty Planner to Assign Leave and Change Schedule Number for Specific User via Ingress / TCMS V3
Introduction In the previous article, we have shared about how to import roster from Excel or text file for a group rosters. However, in this article, we will guide users on how to import roster data from a user duty planner. The difference between ...Import Roster Function from User Duty Planner to Assign Leave and Change Schedule Number for Specific User via Ingress / TCMS V3
Introduction In the previous article, we have shared about how to import roster from Excel or text file for a group rosters. However, in this article, we will guide users on how to import roster data from a user duty planner. The difference between ...How to Change Wallpaper for FingerTec Devices via USB
Introduction Color multimedia FingerTec devices can display different wallpapers. By default, we have provided some wallpapers that you can choose from, however, users can also customize the wallpapers to suit their organization’s preferences. Below ...Smooth Troubleshooting Date/Time Change in FingerTec Terminals to Ensure Accurate Data Accumulation
Introduction These tips are to assist users to determine the root cause of the time change issue on the terminals so that they will know how to tackle the situation effectively. Since it is related to the users’ attendance data, an inaccurate time ...