How to Add TC10, TC20, Face Id 5, Face Id 6 & Kadex+ Device (Time Attendance - T&A Push) in Ingress and AWDMS Software
INTRODUCTION
Device Type
A&C PUSH
Supports Time Attendance and Door Access Control feature
Does not support Work Code feature
T&A PUSH
For Time Attendance purpose only
Does not support Door Access feature
Supports Work Code feature
Device Type Setting
Download the update tool from link above
Insert device IP address > Click Connect
Once connected, select ATT > Click Update > Restart device
Configure Cloud Server Setting (Server Address and Port Number)
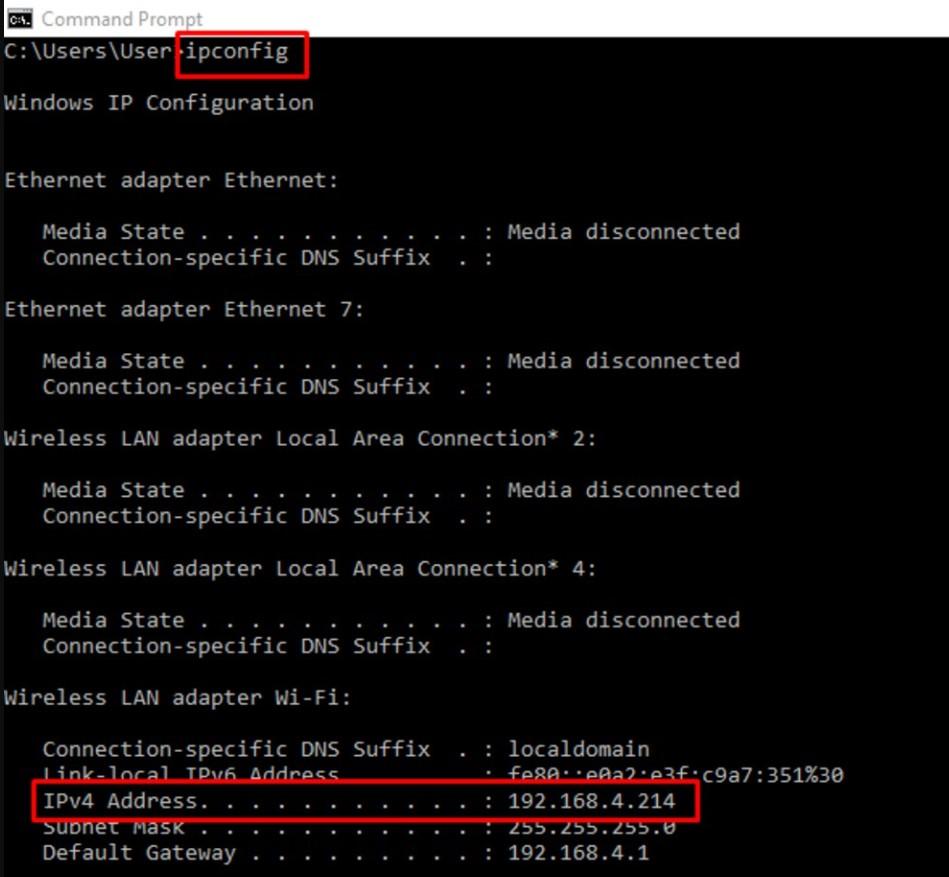
Please check your PC server IP address using Windows Command Prompt. Run CMD > Typeipconfig > Press Enter. You can see from the picture below that the PC IP address is 192.168.4.214.
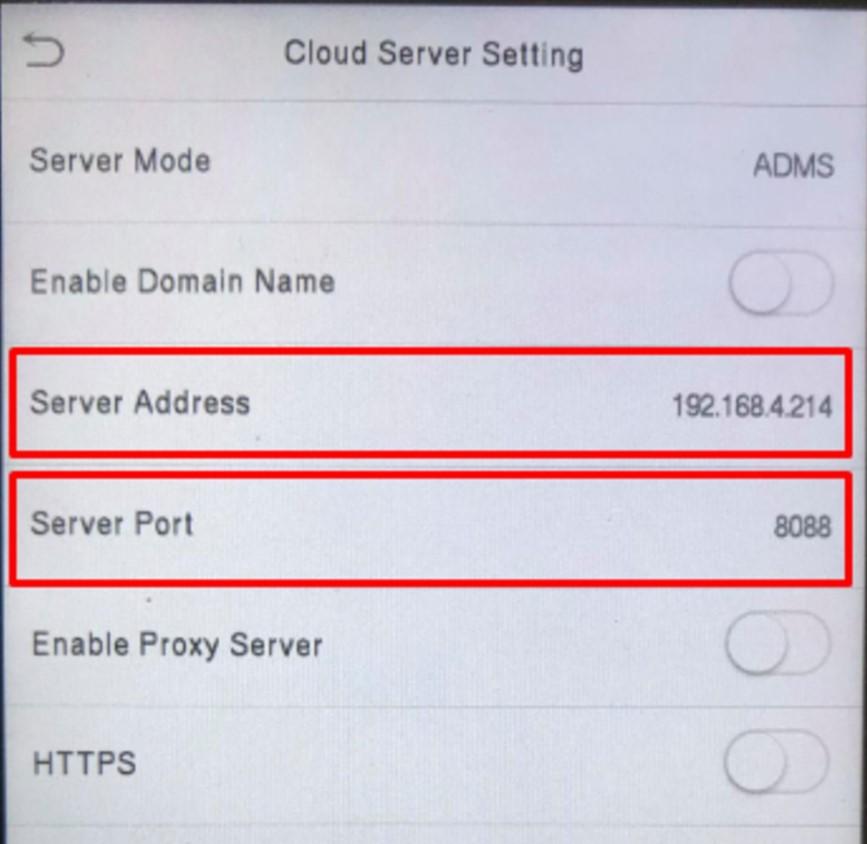
Go to the device. Press Menu > COMM. > Cloud Server Setting > Insert your PC IP address > Set Server Port to 8088.
Search and Add Device in Ingress and AWDMS Software
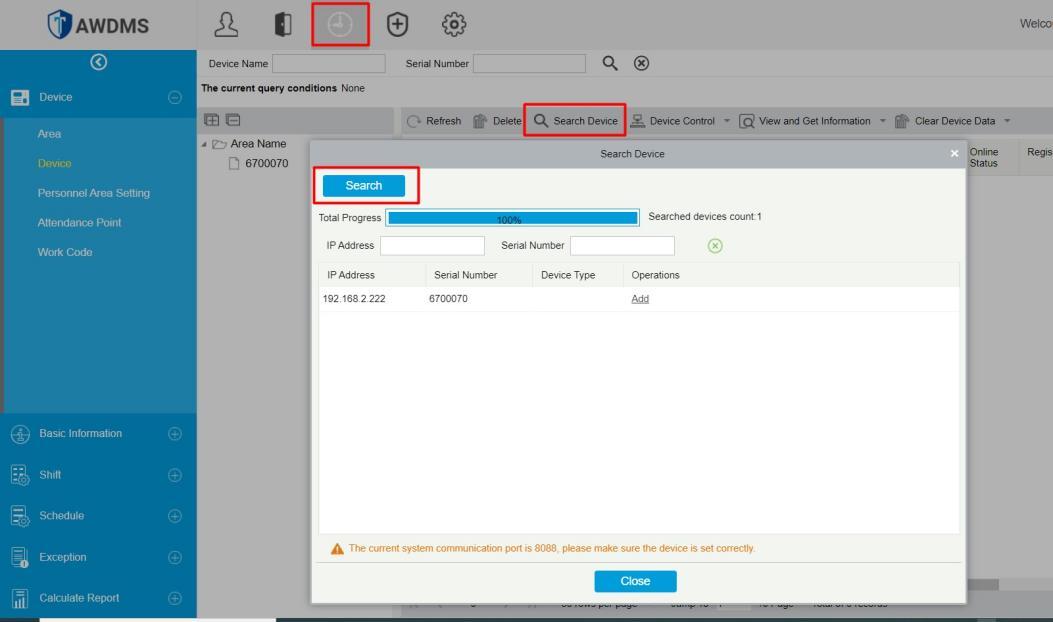
Next, run TimeTec Cloud AWDMS > Click onAttendance module > Device > Search Device > Click Search. After completion, the device details will be listed as per screenshot below.
After you manage to get the device listed in AWDMS, please run your Ingress software. Go to System Settings > AWDMS Configuration > AWDMS Information > Fill in the required information as below > Test Connection > Save.

Next, go to Devices module > Add Device > Set the Device Name > Select AWDMS ATT as Communication Mode > Key in device IP Address > Serial Number > Click ADD.

Related Articles
How to Add TC10, TC20, Face ID 5, Face ID 6, and Kadex+ to the New TCMS V3 Software for Time Attendance (ATT) Device Type
Introduction The latest TCMS V3 software now directly supports Face ID 5, Face ID 6, and Kadex+ devices, eliminating the need for the separate AWDMS software. However, please note that this version is ONLY supported for ATTENDANCE purposes. Before ...How to Connect and Add Push Type Device (Face ID5, Face ID6, Kadex+ and etc.) to TCMSv3 Software
We are excited to introduce the new version of TCMS V3 v4.0.2.6, now equipped with a MySQL database and middleware that enable connectivity with Face ID5, Face ID6, Kadex+, etc. 1) If you use a LAN connection, configure the IP Address, Subnet Mask, ...How to Add New Device (Smart AC1 Series / Face ID 5 Series / Kadex+) in existing Ingress Software and TimeTec AWDMS
Introduction Adding new Smart AC1, Smart AC1/TD, Smart AC1/FTD, Face ID 5, Face ID 5/TD, or Face ID 5/FTD in existing TimeTec AWDMS and Ingress software might lead to problems of synchronizing user data from software to the new device. This is due to ...How to Add New Device (Smart AC1 Series / Face ID 5 Series) in existing Ingress Software and TimeTec AWDMS
Introduction Adding new Smart AC1, Smart AC1/TD, Smart AC1/FTD, Face ID 5, Face ID 5/TD, or Face ID 5/FTD in existing TimeTec AWDMS and Ingress software might lead to problems of synchronizing user data from software to the new device. This is due to ...Troubleshooting – Error When Adding FaceID 5 Device in Ingress Software
Introduction To add Face ID5 or Face ID6 devices on Ingress software through the AWDMS program, you need to follow the instructions step by step as per the manual guide (refer to the link to the article below) ...