Changing Unit Owner in i-Account
Introduction
Periodically, there will be instances of sale or sub sale of a unit in a property. When this happens and management is notified, the Admin has to change the unit owner information and add the new owner into the system. This step is to remove i-Neighbour access for the ex-owner and provide access to the new owner. Furthermore, for communities which are also using i-Account, this is to create a new account code under the new owner for account management and further billing.
Process
i-Neighbour
Once the management is notified of legal change in ownership, Admin can proceed to the Manage Unit page in i-Neighbour to make the changes.
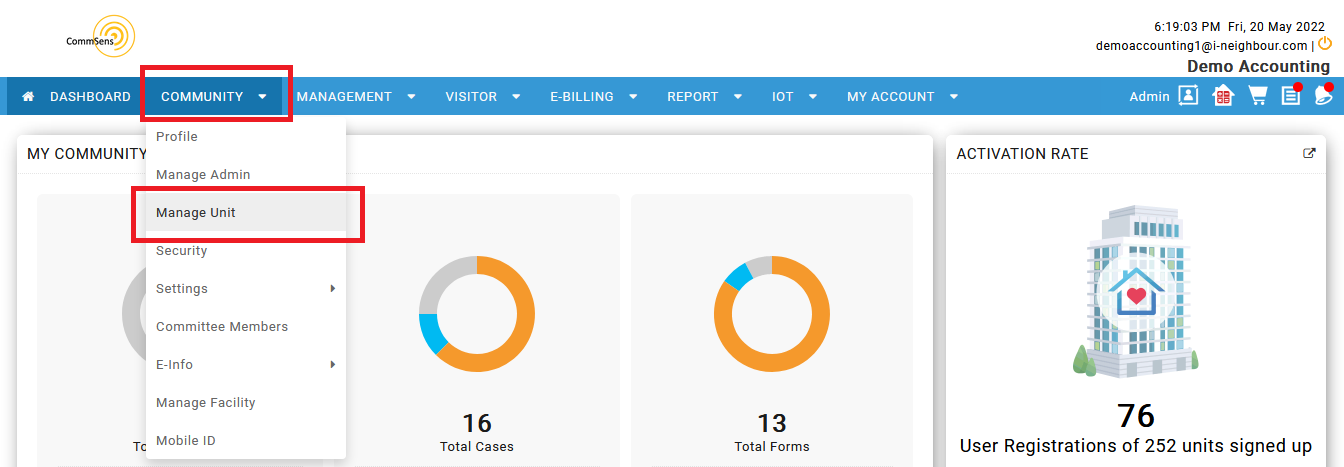
Step 1
Login to i-Neighbour Admin account, choose Community and click Manage Unit.
Step 2
Choose the Block that has a change of owner. For example, the owner is in Block B, then click Block B. Click on the View icon to see the details.
For example, if the existing owner’s Account Code is B-2-2, Admin can assign a new Account Code as B-2-2-1 or B-2-2/1 or B-2-2/01 and etc. Click Save once completed.
Note:
- For i-Account users, when adding unit owners at i-Neighbour, you must assign a unique Account code to identify each individual owner. This Account code will be imported into i-Account and used to sync owner accounts in both applications (e.g. account data such as invoices, receipts and Statement of Account).
- If account code is left as blank, the record will not be synced to i-Account.
Once you click Save, the information for the new owner will be displayed. Thus, the change of owner was successfully recorded in i-Neighbour.
Once the process inside i-Neighbour is completed, all the information will automatically sync to i-Account. The ex-owner will also be deactivated in i-Account (hidden from dropdown menu selection) at all the transaction entry pages. In order to activate or reactivate the ex-owner for entry of new transactions (e.g. issue receipt) or to check records, refer to the following steps:
Inside i-Account, under Accounting Module, go to Sales > Maintenance > Customers.

Tick on the “Show inactive” checkbox. Search and select the ex-owner name by using the Customer dropdown menu.


Step 3
However, if you wish to change settings or unassign the new owner from any group, you can follow the steps as shown below:
1. Go to Property Module > Setup > Customer Groups. Choose the Group Name and click the “Assign” icon.
Related Articles
How to Change Unit Owner
This article will be presenting the steps to change the unit owner after the house/unit is sold or changed to another name/party. The same steps can also be applied in the case that the Admin has added the owner details wrongly during the initial ...i-Account - How to Assign and Unassign Unit Owner to Customer Group
Introduction Admins can assign unit owners into specific groups to differentiate when generating batch invoices or extracting the reports efficiently. To assign the unit owners into a specific group, Admin can follow the step as below: Steps 1. Once ...How to Transfer Invoices from Previous to New Owner
Periodically, there will be instances of sale or sub-sale of a unit in a property. When management is notified, the Admin has to change the unit owner information and add the new owner into the system. After changing owners, management needs to ...i-Account User Guide Pages
Billing, Account Statement & Notice Generate Quarterly Billing (SCI Statement) Automatically with Auto Recurring SCI Feature Link How to Charge Late Payment Interest (LPI) Link How to Issue Direct Invoice Link How to Upload Water (or Electricity) ...How to Check Transactions of Previous Owners in i-Account
Introduction Eventually, there will be instances of sale or sub-sale of a unit in a property. When this happens, and the management is notified, the Admin has to change the unit owner information and add the new owner into iNeighbour. Refer to the ...