A Simple Tool to Upload User Photos into Devices That Runs on FEM Series Coreboards
The newest version of TCMS V2 and TCMS V3 are compiled with the latest Software Development Kit (SDK) to build an advance adaptation of TA100C and AC100, which are equipped with the new Core Board version known as FMM 100, replacing its older predecessor, FEM510.
However, due to the situation that FEM510 and FMM100 models are running on different platforms, the new SDK used in these 2 software are not fully compatible with the older models that are running on FEM coreboards. Thus, uploading user photos into FEM model devices can no longer be done directly from TCMS V2 or TCMS V3.
However, due to the situation that FEM510 and FMM100 models are running on different platforms, the new SDK used in these 2 software are not fully compatible with the older models that are running on FEM coreboards. Thus, uploading user photos into FEM model devices can no longer be done directly from TCMS V2 or TCMS V3.
Benefits
Having photo identification during fingerprint verification will further enhance the validation process that the machine is capturing the correct user.
This tool allows the administrators to upload multiple user photos at the same time, without requiring any software assistance.
Process
To upload user photos into FEM devices, please follow the steps below:
Step 1:
Be sure to have the device connected to a PC through TCP/IP connection. You can test the connection by pinging the device’s IP address, and connecting it to Device Info tool
Step 2:
Proceed to download the “FTUserPhoto” tool from here.
Step 3:
Go to your PC’s Control Panel > Program and Features > Turn Windows feature on or off > Check the all the options under “.NET Framework 3.5(includes .NET 2.0 and 3.0” option.)

Step 4:
Prepare the user photo according to the specifications below:
- The resolution of the photo must be 320 x 210px, and the size must not be more than
30KB.
- File type must be in JPEG format (.jpg)
- Ensure to rename the user photos the same as the user IDs (for example user ID is 900, the photo must be renamed as 900.jpg)
Step 5:
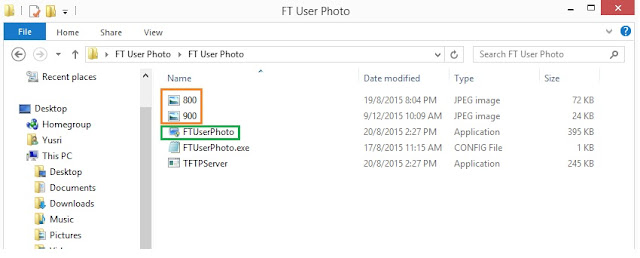
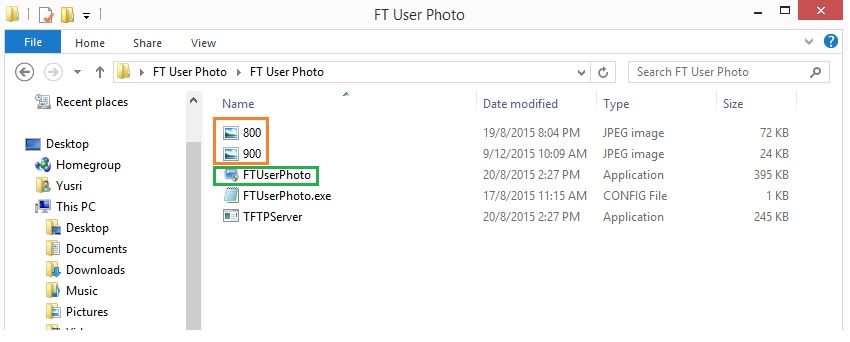
Copy all user photos and paste them inside the “FTUserPhoto” folder (User photos must be in the same folder with the FTUserPhoto tool)
Step 6:
- Turn OFF your PC’s Wi-Fi, Windows Firewall and Antivirus
- Run the FTUserPhoto tool as Administrator
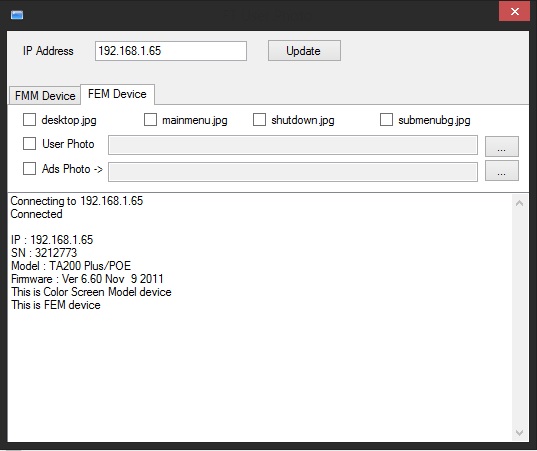
- Insert device IP address and click the “Connect” button. (it will show the device information once connected)
Step 7:
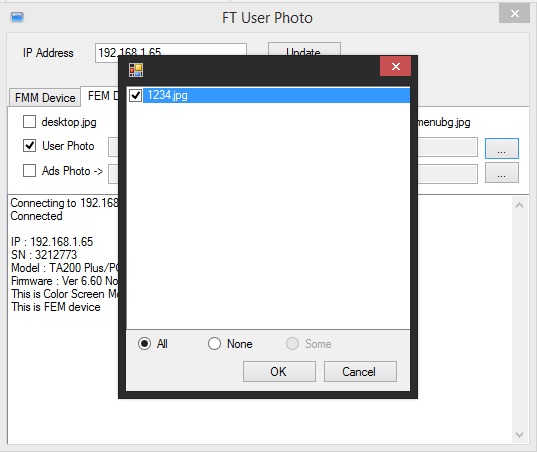
- Tick User Photo (box 1)
- Then click the button (box 2) and Select user photos.

Step 8:
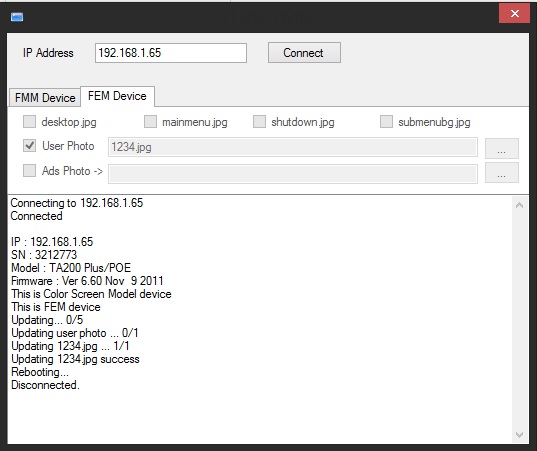
Click “Update”, and the tool will update the user photos into the device, and reboot the device once.
Step 9:
After successfully updating the photos, you will be able to see the photos accordingly during the verification process. Kindly refer to the pictures below;
Before:

After:

To upload user photos into FEM devices, please follow the steps below:
Step 1:
Be sure to have the device connected to a PC through TCP/IP connection. You can test the connection by pinging the device’s IP address, and connecting it to Device Info tool
Step 2:
Proceed to download the “FTUserPhoto” tool from here.
Step 3:
Go to your PC’s Control Panel > Program and Features > Turn Windows feature on or off > Check the all the options under “.NET Framework 3.5(includes .NET 2.0 and 3.0” option.)

Step 4:
Prepare the user photo according to the specifications below:
- The resolution of the photo must be 320 x 210px, and the size must not be more than
30KB.
- File type must be in JPEG format (.jpg)
- Ensure to rename the user photos the same as the user IDs (for example user ID is 900, the photo must be renamed as 900.jpg)
Step 5:
Copy all user photos and paste them inside the “FTUserPhoto” folder (User photos must be in the same folder with the FTUserPhoto tool)
Step 6:
- Turn OFF your PC’s Wi-Fi, Windows Firewall and Antivirus
- Run the FTUserPhoto tool as Administrator
- Insert device IP address and click the “Connect” button. (it will show the device information once connected)

Step 7:
- Tick User Photo (box 1)
- Then click the button (box 2) and Select user photos.


Step 8:
Click “Update”, and the tool will update the user photos into the device, and reboot the device once.

Step 9:
After successfully updating the photos, you will be able to see the photos accordingly during the verification process. Kindly refer to the pictures below;
Before:
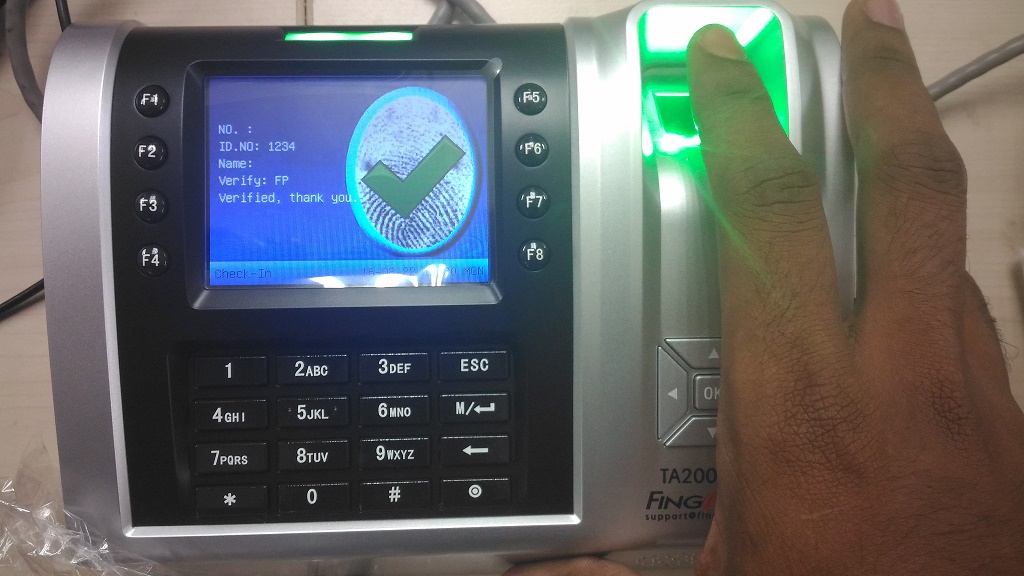
After:

Related Articles
Upload User Photos into Fingertec Devices using FTUser Photo
Introduction The latest version of TA100C and AC100C devices are equipped with the new Core Board version known as FMM 100, replacing the FEM510. The new coreboard is loaded with 800MHz microprocessor, 128MB RAM and 256MB flash memory. With the new ...Upload Existing Users and Devices from Ingress to TimeTec TA
Introduction FingerTec has recently released Ingress v3.2.2.20 which includes a new feature, Integrating TimeTec TA with Ingress. This new feature allows clients to upload their existing users and devices to their TimeTec TA account. Furthermore, it ...Download & Upload User Data and Download Transaction Data Using USB Flash Disk to Ingress
Introduction Network and communication between FingerTec devices and software allows user to work remotely and enhance efficiency at the same time. A proper and stable network is surely an advantage for user to transfer employees and transaction logs ...How To Perform Uploading Photos by Batch To Smart AC Series/FaceID 5 Series
Introduction To enroll face templates of all staff for a large workforce organization can be challenging. However, AWDMS is now released with an easier approach to facilitate the uploading process of user photos to the device(s) and use as face ...How To Use The FingerTec Device Info Tool
The FingerTec Device Info tool is designed to link up your FingerTec devices for reading its vital information. This information is important for the support team to know before best assisting you. Read more for the download link and instructions on ...